


What is MetaMask? How does it work?
MetaMask is one of the most popular Ethereum tools out there. As a cryptocurrency wallet, it allows users to access multiple accounts through a browser extension or mobile app. Developers use MetaMask to test dapps, traders use it to lend and borrow on DeFi protocols, and collectors use it to purchase NFTs. It's a staple in today's Web3 world!
But... do you know how MetaMask processes all of these transactions? As a wallet, it needs to show users key information such as the account balance, a history of transactions, estimated gas fees, and more. It's also responsible for sending transactions to the blockchain on behalf of users. So how does MetaMask process all this important information?
MetaMask reads and writes information to the blockchain by connecting to a node! It makes a connection by using a default node provider that shares resources across all MetaMask users. While having a default shared provider means that it’s easy for users to get set up, there are lots of downsides:
- your transaction processing time might feel slow
- you might see inconsistent block data
- you might pay more gas than necessary due to out-dated gas fee estimations
- and worst of all, the default node provider may stop working completely
When there’s an outage, you do not want to be stuck, unable to send important transactions right when you need it the most.
What are the benefits of using Alchemy as the node provider?
Alchemy has created an entirely new Web3 infrastructure technology known as Supernode that solves for data consistency, scalability, and outage issues -- problems that are common in other node providers. By hooking Alchemy up with your MetaMask wallet, you also unlock game-changing tools for monitoring and debugging such as the Mempool Visualizer and Alchemy Notify.
Let me illustrate with two quick scenarios:
Scenario 1: Minting NFTs
Let’s say you’re using MetaMask to send transactions to a dapp to mint the latest NFT drop. What do you do if time has passed, your transaction has not completed, and you don’t know why?
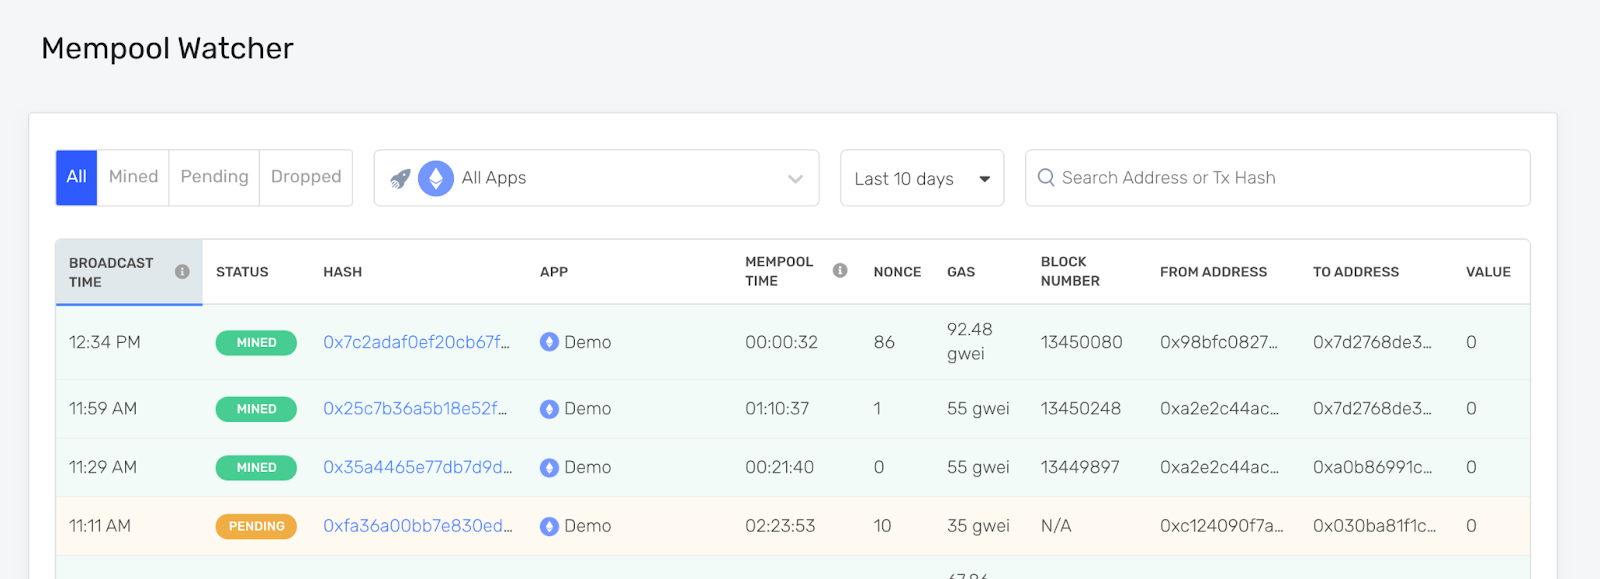
With Alchemy's mempool watcher, you get to see your pending transactions before they’re even broadcast to the rest of the network! You can click into each transaction in the mempool and see detailed information, including whether your transaction failed to include enough gas fees, or whether you have transactions with conflicting nonce values. Having this visibility is crucial if you want maximum control over your trades because you can see when your transactions are getting stuck and why.
Scenario 2: Alerting on Transactions
Now let’s say you want to send yourself an alert when key transactions occur (e.g. transfers from your wallet of greater than 1 ETH), or you might want to know when your transactions are mined but then dropped. Normally, you might make your MetaMask transactions, and then use a blockchain explorer to manually sift through your history… but this would be time-consuming and error-prone.
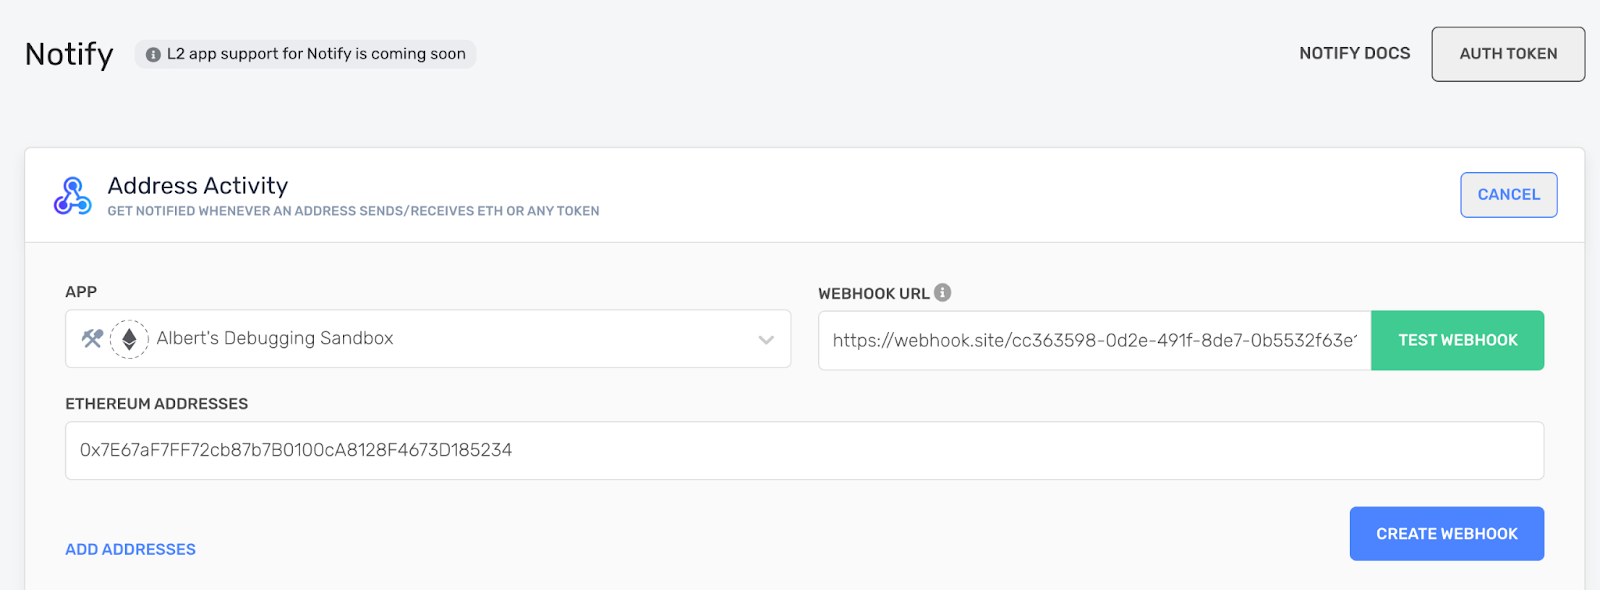
With Alchemy Notify, you get webhook functionality that automatically pushes any on-chain transaction data over to your own apps as your transactions are happening! With this power you can bring blockchain data over to where you need it most – Slack, Discord, a tax accounting application – the possibilities are endless :)
So How Do I Change My MetaMask Node Provider?
Alright so now you’re wondering how to get all these cool benefits from your MetaMask wallet.
You’re in luck :) The process is super easy. Let’s go through it together.
Set up a free Alchemy account
This is a very important step.
Now create a custom RPC configuration in MetaMask
Ready for the fun part?
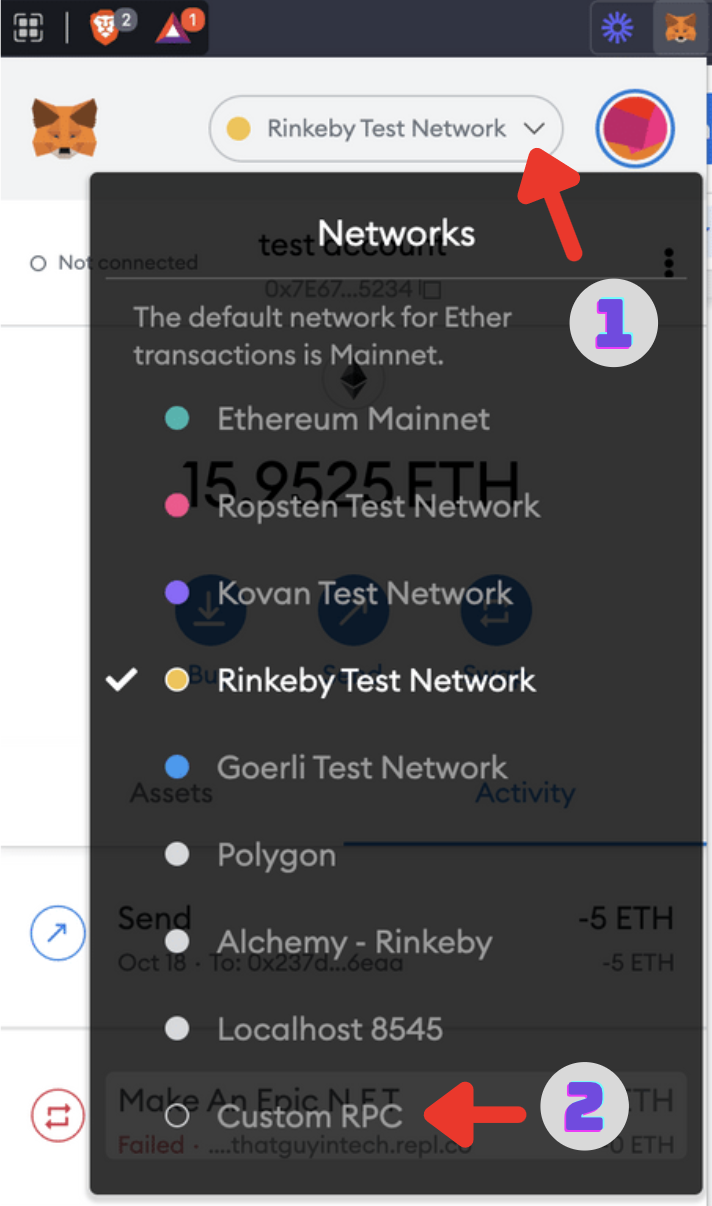
1. Navigate to your MetaMask wallet and click the network dropdown at the top, selecting Custom RPC at the bottom.
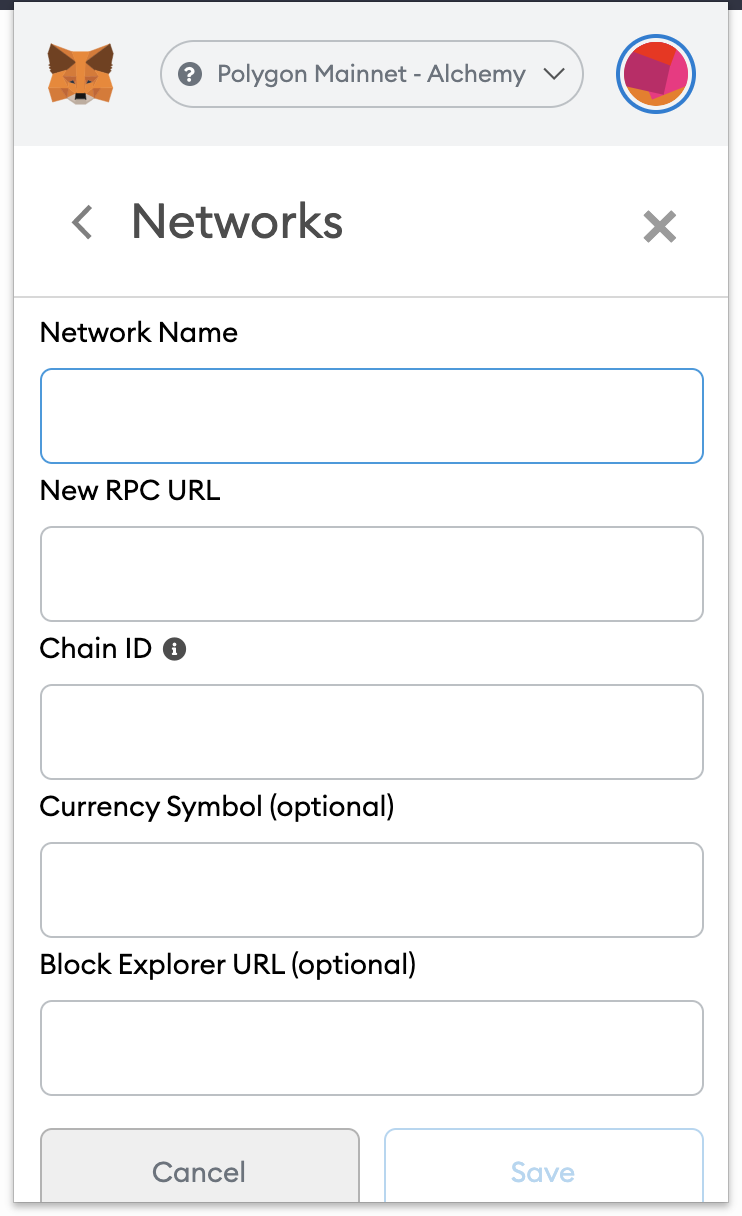
Let's fill in these custom RPC information fields.
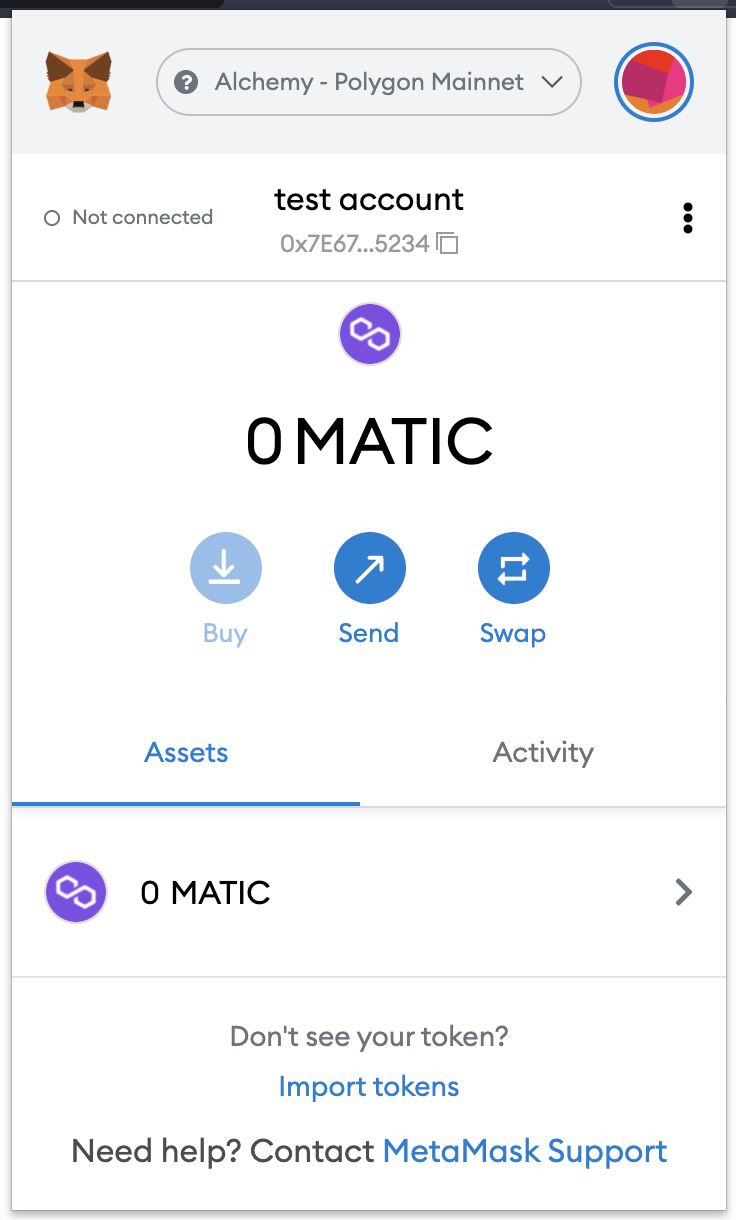
2. You can name your Network Name anything to remind you which chain you’re connecting to. For example, if you're connecting to Polygon Mainnet, you can call this configuration "Alchemy - Polygon Mainnet".
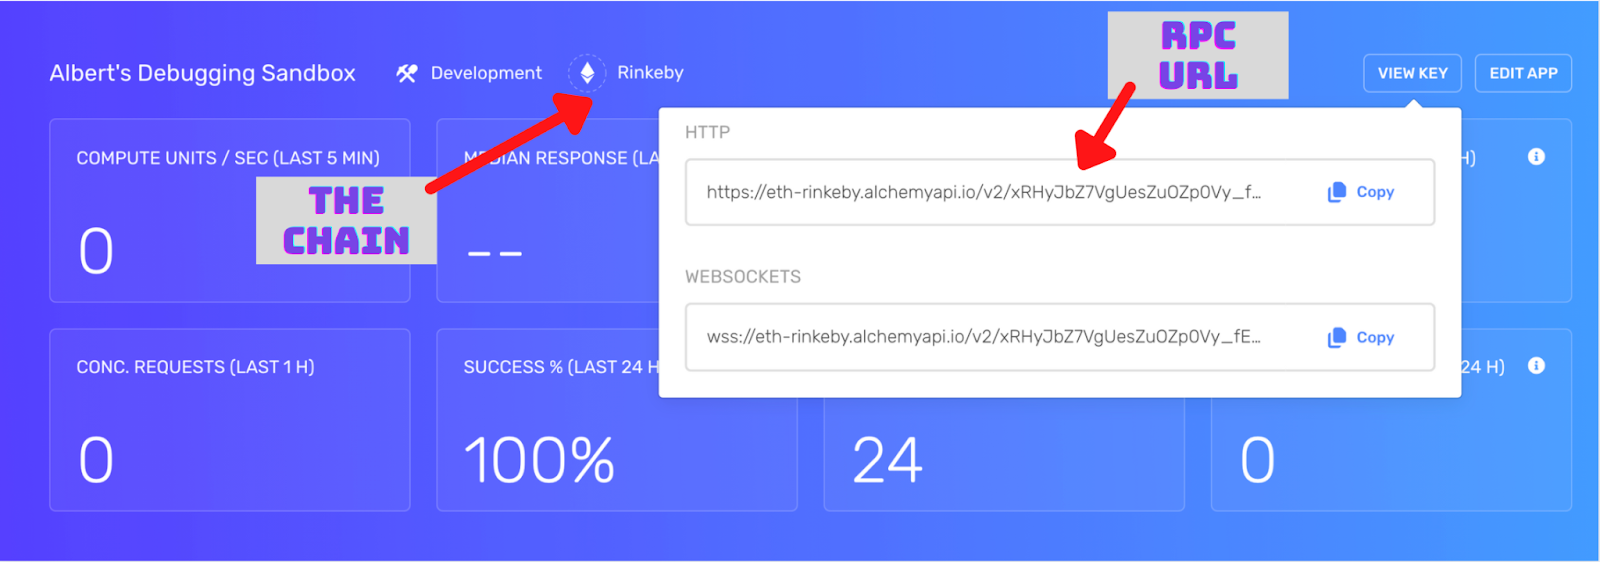
3. For the New RPC URL field, grab the HTTP API key URL from your Alchemy Dashboard. If you don't have a dashboard account, go back up to the "Set up a free Alchemy account" step and set up your account.
Make sure your Alchemy app’s chain matches the chain you want to connect to.
4. Look up the Chain ID for the network you want to connect to.
- Ethereum Mainnet - 1
- Ropsten Testnet - 3
- Rinkeby Testnet - 4
- Goerli Testnet - 5
- Kovan Testnet - 42
- Polygon (Matic) Mainnet - 137
- Mumbai Testnet - 80001
- Arbitrum One - 42161
- Optimism (Optimistic Ethereum) - 10
- Optimistic Kovan - 69
5. Currency Symbol and Block Explorer URL are optional. For most chains, no input is needed here. For the L2s and side-chains, setting these can be useful.
Polygon:
- Currency Symbol - MATIC
- Block Explorer URL - https://polygonscan.com/
Arbitrum:
- Currency Symbol - AETH
- Block Explorer URL - https://arbiscan.io
Optimism:
- Currency Symbol - ETH
- Block Explorer URL - https://optimistic.etherscan.io
When you're done, your configuration should look something like this:
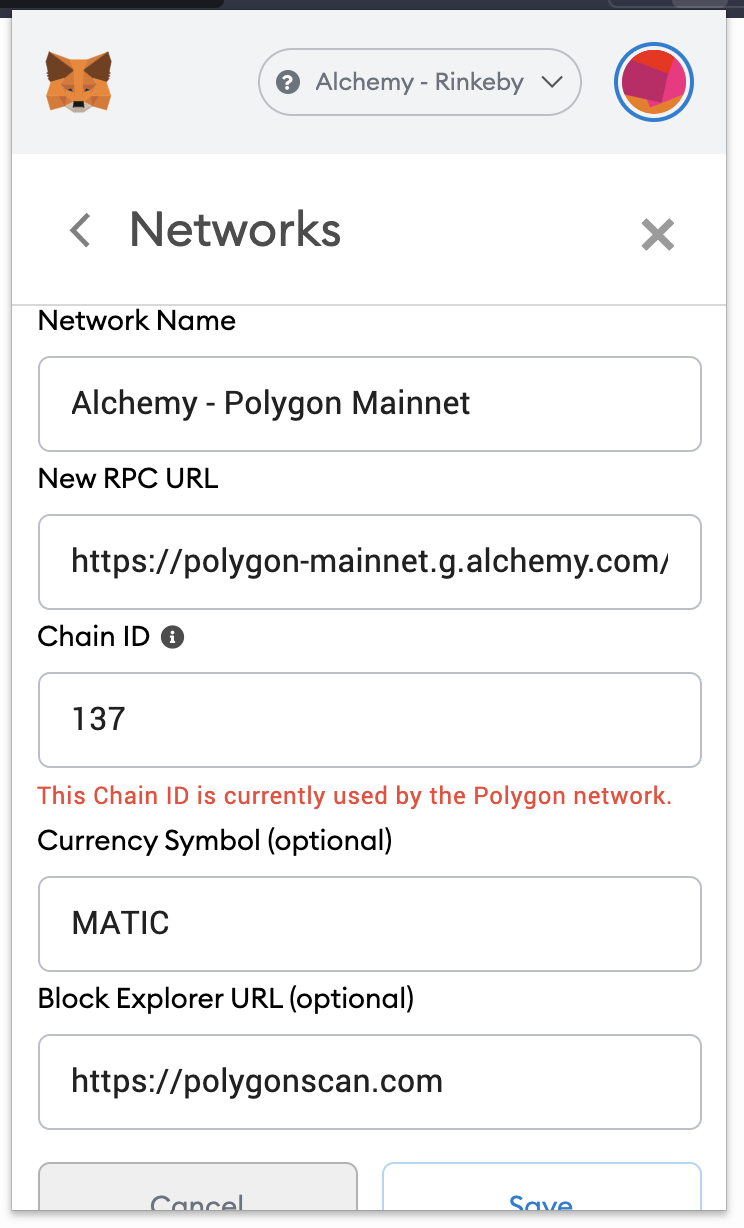
And don’t worry if you get a warning like:
This Chain ID is currently used by the Polygon network.
This is just MetaMask reminding you that you have another configuration for the same chain, which is totally allowed. Once you have these info boxes filled out, just hit Save!
And that’s it! You're done!
Now sit back, relax, and send your transactions!
Just use MetaMask as you usually would :)
And Then... Leverage the Alchemy Developer Platform
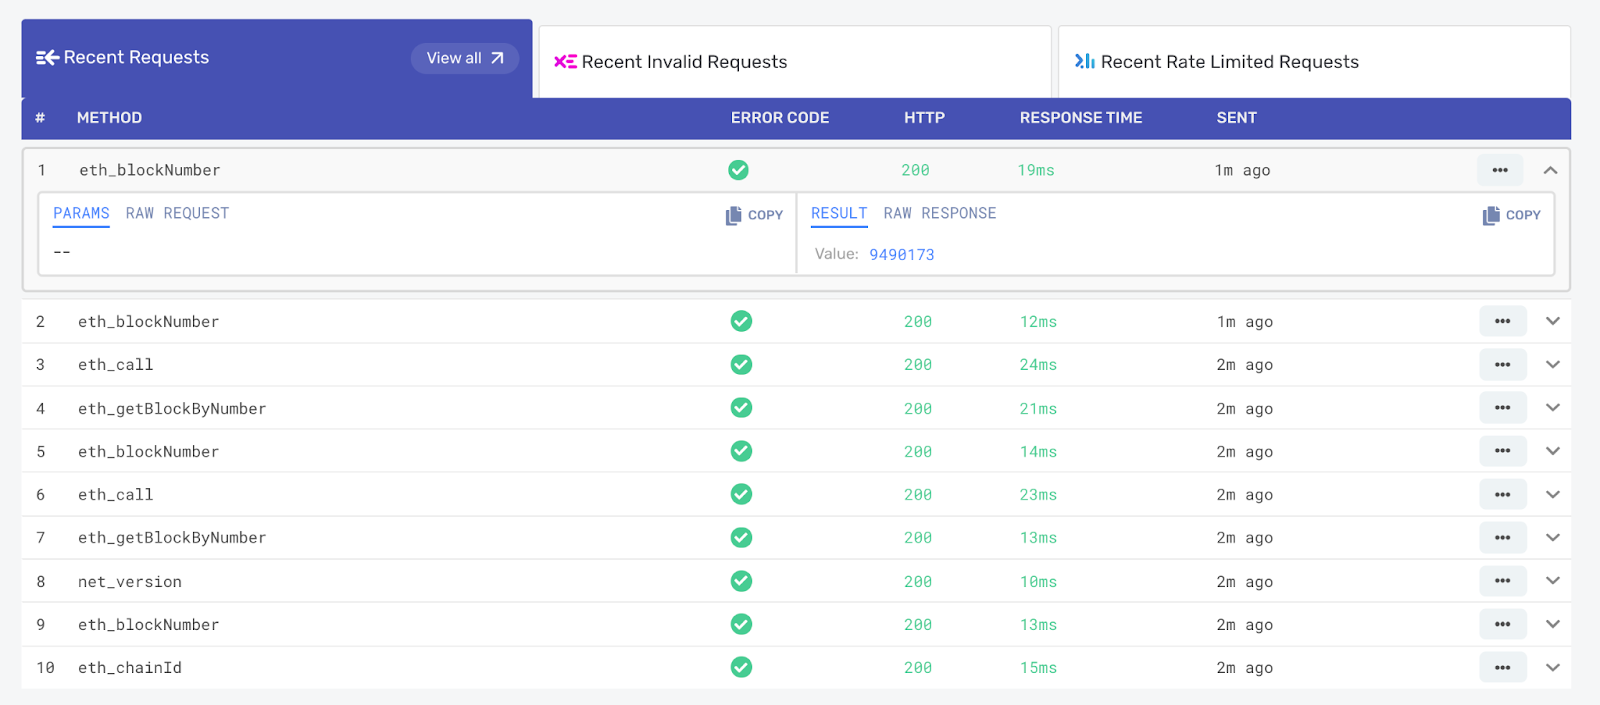
With Alchemy connected, you can visit your app in the Alchemy Dashboard and see the API calls MetaMask is making:
Or track your pending and mined transactions in the Mempool Watcher:
Or even set up webhooks with Alchemy Notify to automatically get alerts on your wallet activity:
As you can see, whatever you want to do with your MetaMask transactions, Alchemy has you covered!
If this guide was useful to you, give us a shoutout on Twitter @AlchemyPlatform :)


