


There's a lot of excitement around NFTs, and with good reason. With a few lines of Solidity code, you can create a token that represents ownership of a unique artwork (Twin Flames 2). You can even encode that artwork within the code itself (Art Blocks). NFTs can be used to register your own .eth name or signal membership in a community (BAYC). The future is bright for NFTs, and the technology holds immense potential for value creation. Whether that value endures, however, depends on the security of the underlying contract.
In this tutorial, I'll show you how you can create and deploy an NFT contract —without needing to touch a single line of Solidity code or JavaScript—using the OpenZeppelin Contracts Wizard 1. You'll be able to manage your token via a multisig, using OpenZeppelin Defender to mint tokens and to pause the contract's functionality in the event of an emergency.
By the end of this tutorial, you'll have your own deployed NFT contract. More importantly, you'll also have some valuable experience with important concepts in secure contract deployment and administration.
Create Three Accounts
First, let’s take a look at the issue of contract ownership. A simple NFT contract can be deployed with any externally owned account (EOA). For example, you can use your Metamask account to deploy a contract, and then your account will own that contract. As long as no one steals your private keys and you never lose access to that account, you will be the sole owner of that contract and you can run whatever admin functions you assign to it. However, it is not secure for a single EOA to act as contract administrator.
A more secure practice is for your smart contract to be owned by a multisig. Think of a multisig as a team wallet that consists of more than one account. Often, ownership of a multisig would be distributed to three to five different individuals using hardware wallets in different locations, but in this case, for simplicity, you’ll create three Metamask accounts and remain sole owner of all of them. A three-account multisig provides an additional layer of security when you specify that two out of the three accounts in your multisig must approve a given transaction.
For a three-account multisig, you will need to have three separate accounts. It's easy to create a new account in Metamask by clicking your account image then selecting Create Account. Once you have done this three times, you're ready to proceed.
Important security note: It's a good practice during development to use a different wallet and even a different browser than the one you might normally use to make transactions on Ethereum. Even though Rinkeby is a different network from mainnet, your Rinkeby private key is the same as your mainnet private key. If you accidentally leaked your private key while developing, you would likely lose all of the assets owned by that wallet, so using a different browser—and different accounts entirely—is a worthwhile thing to do.
Get Testnet ETH
It costs gas to store data to the blockchain. You will need to pay for that in ETH. Fortunately, since you will be using a testnet, you can use testnet ETH, which can be freely obtained from a faucet.
A faucet is a smart contract that sends a predetermined amount of ETH to any contract that calls it. Only one of your three accounts will need to be funded with ETH. Once you have obtained your ETH from a faucet, you're ready for the next step.
I've assembled a list of Rinkeby faucets here.
Create a Gnosis Safe with Defender Admin
OpenZeppelin Defender is a security operations (SecOps) platform for Ethereum development. In this tutorial, you will use it to manage your multisig account and to run admin functions on your deployed contract.
Head over to defender.openzeppelin.com. If you don't have an account already, you'll need to sign up. The free account will give you loads of functionality, which we will explore more in future tutorials.
- Once signed in, you'll see a few options on the left nav. Select Admin --> Add Contract --> Create Gnosis Safe.
- In Metamask, select the Rinkeby network.
- Click Connect Wallet and select an account that holds the testnet ETH that you obtained from the faucet.
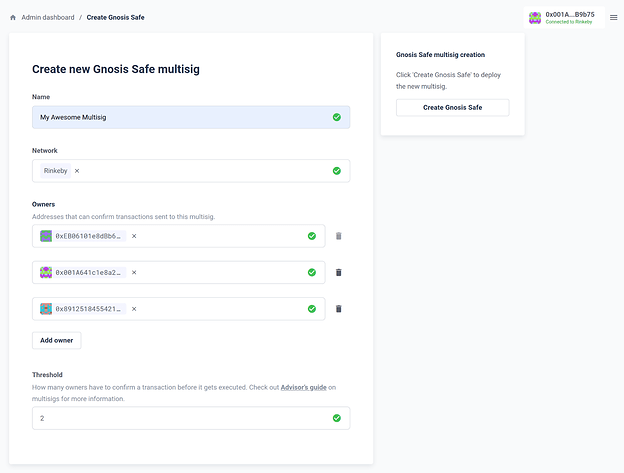
- Give your multisig whatever name you'd like and select the Rinkeby network.
- Under Owners, you'll need to add the address of each of your three Metamask accounts. To do this, you select an account in Metamask, copy the address, paste it into Defender, and then select Add Owner. Repeat this step for each Metamask account.
- Set your Threshold to 2.
- Click Create Gnosis Safe.
- Each account connected to Defender will need to confirm the transaction.
When you see the “Transaction Confirmed” message, you can click Go to Safe to see the details of your multisig. Later in this tutorial, you will transfer ownership of your NFT contract to this account.
Important security note: In this tutorial, the three-account multisig has a threshold of 2, meaning that 2 out of the three accounts must approve any transaction for the transaction to go through. A 2-of-3 multisig is more secure than an EOA. Setting a threshold of 1 would be less secure than an EOA, since if any one of the accounts were compromised, a transaction could be approved on behalf of the multisig.
Consult the Wizard
The OpenZeppelin Contracts Wizard allows you to jump-start development by giving you pre-built Solidity code from the latest release of secure OpenZeppelin contracts based on the selections you make. You can take this code and export it to Remix or download it for working locally.
Go to wizard.openzeppelin.com 3 to proceed.
With this tool, you can create ERC20 fungible token contracts, ERC721 NFTs, ERC1155 multi-token contracts, and Governor contracts for managing a DAO. Since you’re making an NFT, you could select either ERC1155 or ERC721. For this tutorial, we will select ERC721.
The Contracts Wizard gives you several key options specific to your chosen contract standard so that you can get up and running simply by making your desired selections on the left-hand panel.
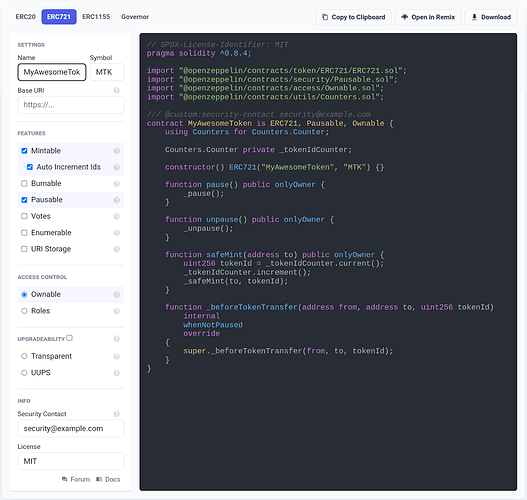
Under Settings, give your token whatever Name and Symbol you would like.
You can ignore Base URI for the time being, since you won’t be using your token to point to any metadata in this tutorial.
About Metadata: Token metadata is a whole topic unto itself, so we will devote a future tutorial to that aspect of NFT development. For this tutorial, the focus is on secure contract ownership and administration. This is a very important building block for dealing responsibly with immutable code on a decentralized public blockchain.
Under Features, select Mintable, so that you can create new tokens by calling a mint function.
Next, let's consider the token's access control. The Wizard's tooltips are very helpful for explaining the main idea here. You need some form of access control to answer the very important question of who gets to own and call which function. Ownable is a straightforward rule for access control.

By default, Access Control is set to Ownable and our contract is set to import Ownable.sol. You’ll note in the code there is an onlyOwner modifier on public functions, which means only the address of the contract’s deployer can call it. The deployer’s address gets stored as the contract owner by the constructor when the contract gets created and written to the blockchain. Later, you will update the contract’s ownership by running a function to transfer ownership to your multisig account.
In addition to the onlyOwner modifier, making the contract Ownable gives you other functions you can use, such as renounceOwnership and transferOwnership. These functions can be called by the existing owner to permanently change which account the contract regards as its owner.
Why would a user want to renounce ownership of a contract? Depending on the contract, renouncing ownership could be done as a sign of good faith that the contract is not at risk of being tampered with by any meddlesome administrator. The contract would still exist, tokens could still be freely transferred, and the contract’s public or external state variables could still be queried. In short, any external or public functions not restricted by the onlyOwner modifier could be called.
Select Auto Increment Ids so that each time a token is successfully minted, the contract keeps track of the number of total tokens minted. You can see that happening with the Counters.sol import and with the code added to the safeMint function.
Next, let's look at the issue of pausability. Selecting Pausable adds the functions pause and unpause as well as a check that happens when using the whenNotPaused modifier on token transfer. By default, paused is set to false. Pausing a contract affects token transfer because the added _beforeTokenTransfer function runs when someone wants to transfer a token.
Why consider implementing this? As mentioned, if something catastrophic were to occur, pause allows you to disallow token transfer functionality until the contract gets unpaused.
Of course, for transparency’s sake, it would be a good idea to alert your users about the issue, but that is another matter.
Backing up a step, contract pausability gets us to consider what really happens during the transfer of a token. Your digital wallet isn't like a physical wallet with fiat money. When you own an NFT, that NFT doesn't ever get transported into your wallet. It’s more accurate to say that your wallet contains your private key and its ability to sign transactions. Ownership of an NFT happens by virtue of your public key getting stored on the smart contract to which the NFT belongs in a mapping of address to token id.
Feel free to experiment with various functionalities to see what gets added or modified in the code supplied by the Contracts Wizard.
On upgradeability: Remix currently doesn't work for deploying upgradeable contracts. Contract upgradeability really opens things up, so in a future tutorial, you’ll make an upgradable contract, working locally using VSCode and Hardhat.
You’ll notice there's a space for a Security Contact. It is a good idea to include this now, since you won’t be able to edit your contract once it’s deployed. In the event that you want to add any monitoring or alerting service later, this allows your contract to be registered with that service once your code is verified.
At this point, you should take a step back and look at what you have here. It's secure, it's awesome, and it only took a bit of thought about what functionality we'd like your NFT contract to have.
Import to Remix
When you’re ready, simply click Open in Remix, and everything will be imported into Remix. Remix is a bonafide Solidity IDE, so once your code is imported here, you could add to it or change things around. However, since the Wizard left everything in good shape, don’t change anything.
Compile
Compiling your code makes it possible to deploy it to the blockchain.
On the left, ensure that the compiler either matches the version of Solidity specified by your pragma or is a more recent version and click Compile contract-{someAlphanumeric}.sol.

The code will compile and you’ll see some new options on the left. Down below, you’ll notice a link to copy the ABI and bytecode. We won’t be using it here, but if you are building a frontend to interact with your smart contract, you’ll need the contract’s ABI, which is essentially an API used by a library such as ethers.js.
Deploy
Deploying our code sends a transaction to write it to the blockchain.
From Remix’s toolbar, select Deploy & Run Transactions.
Let’s consider the different environments for a moment. If we leave it as JavaScript VM, it won't cost us anything to deploy, but it also won't exist outside of Remix. This option is great for initial testing and experimenting, but we are ready to deploy our code to a public testnet. A public testnet is a bonafide blockchain with miners and gas fees, with a key difference: testnet ETH has no real-world value. If you make a mistake on a testnet and need to redeploy, it won't set you back financially.
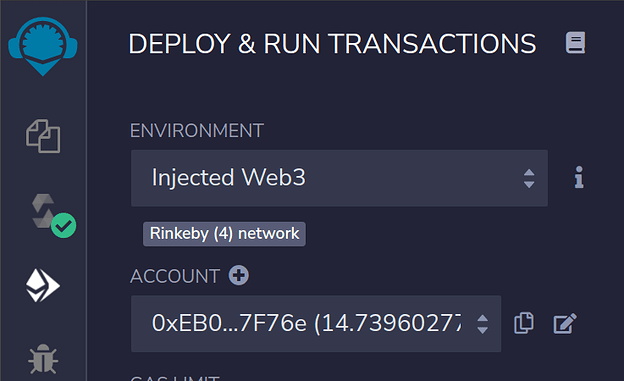
First, double-check that you are using a Metamask wallet used only for development. This should be the same wallet you filled with some Rinkeby ETH earlier. In your Metamask wallet, ensure that you are on the Rinkeby network.
Under Environment, select Injected Web3. Doing so will cause Metamask to connect to the site.
Once connected, you will see your account's public key displayed under Account.
Things are getting exciting! Let’s take this opportunity to dig deeper into what’s happening behind the scenes when it comes to import statements in contracts. Although all that we see at first is the additional line of code at the top, there is more going on here, and it explains where the additional functionality comes from.

Under Contract, click the dropdown. At the very bottom, you’ll see your ERC721 token contract. But where did all these other contracts come from? These are the imports specified at the top of the contract along with all their necessary dependencies. In effect, you can think of your contract as including each of these contracts first, all in one long mega-contract.
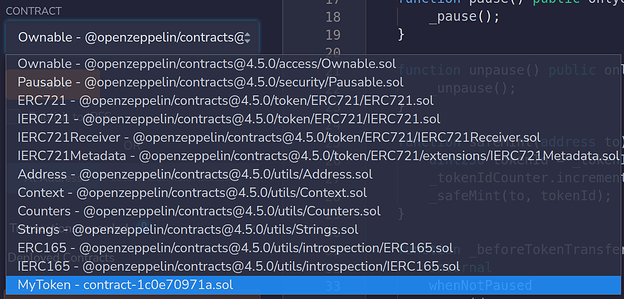
You’ll notice that Ownable shows at the top of the list, but we want to deploy our token, not just Ownable, so be sure to select your token contract. When you deploy it, all the imports and dependencies will get deployed in the same transaction.
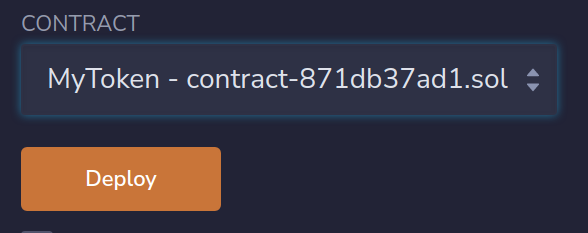
Selecting Deploy will prompt you to confirm the transaction in Metamask and pay for gas.
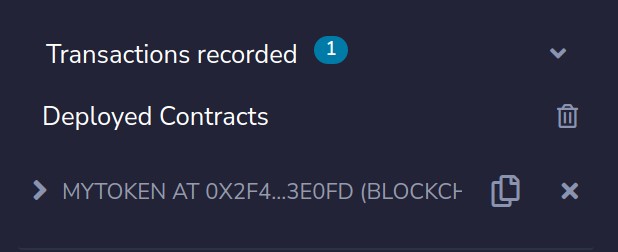
At the bottom of the screen, Remix lets you know that the transaction is being mined and when it gets confirmed. It includes details of which block, the address deployed from, etc. You can select view on etherscan to see all the details of that specific transaction.

In Etherscan, the From address shows the address you just used to deploy the contract. Selecting that address will show you any previous transactions made by that address, indexed by Etherscan.
The To address is the address of the deployed contract.
You can also view the contract by going back to Remix, clicking the button to copy the address where it says Deployed Contracts, and entering that in the search box in Rinkeby Etherscan.
Contract Verification
Verified contracts are those that make their source code easily accessible to anyone looking them up on Etherscan. Verifying a contract also allows users to run any publically available read/write functions directly from Etherscan. While verifying your source code is not necessary, it is definitely a good practice.
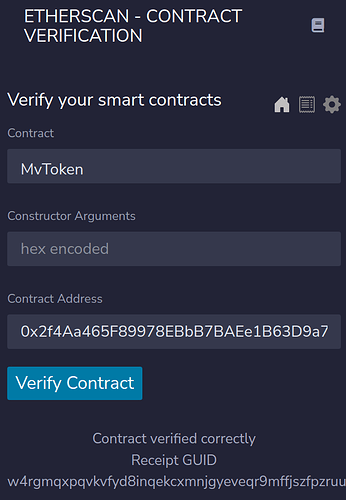
To do this in Remix, you’ll need to first add the Etherscan Contract Verification plugin by clicking the plug at the bottom left. Search for Etherscan and install it. Once it’s installed, select the Etherscan Contract Verification plugin from the left navigation bar.
You need an Etherscan API key, which you can get by going to etherscan.io and creating an account. Once logged in, you'll see in the dropdown under your user ID a listing for API KEYS.
Once you have your API key created and copied, return to Remix and paste it in, then select your token contract from the dropdown. (You don't need to include any constructor arguments.) Paste the address of the deployed contract. You can find this in Etherscan in the To: field from the transaction earlier. You can also find it in Remix in the Deploy section under Deployed Contracts.
Interacting with Your Verified Contract on Etherscan
Return to Etherscan and select Contract. You will see the complete source code of your contract along with all of the imported contracts. Because your contract has been verified, you also gain the ability to read and write to the contract. Selecting Read Contract shows functions you can call on your contract that don’t cost gas.
Selecting Write Transactions shows you the functions that require you to connect your wallet and pay for the transaction because they change the state of the blockchain.
Etherscan gives verified contracts this very minimal frontend for transacting with deployed and verified contracts. It’s minimal, but good enough to run the same transactions for which you would use ethers.js when developing a full web app.
Right now, querying these won't tell us anything very interesting. We haven’t minted any tokens. Let’s turn back to Defender for that part.
Importing the Contract into Defender
Defender is an awesome tool for working with deployed contracts. To begin the process, we need to import the contract into Defender. “Importing a contract” makes no change to the contract itself. Rather, just think of Defender as a tool for calling a contract’s functions. In fact, it’s equally possible to import any verified contract into Defender, whether it is owned by you or not. It is a public blockchain, after all!
Head back to Defender and select Admin. You’ll see the multisig created earlier. We will make use of that in a bit.
Select Add Contract → Import a New Contract from the top right-hand corner.
You can name it anything. For simplicity’s sake, it’s a good idea to give it the same name as the deployed contract.
Select Rinkeby and paste in the deployed contract address. Remember: You can find the contract address via Etherscan as the To: field of your wallet’s most recent transaction or in Remix under Deployed Contracts.
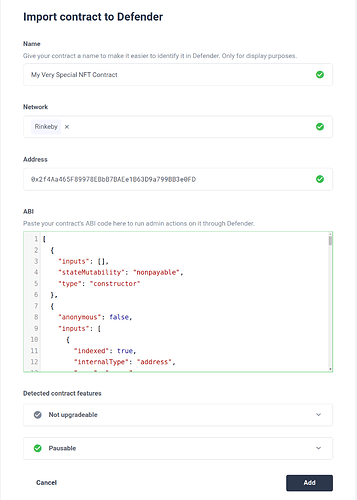
Because the contract has been verified, Defender loads the ABI automatically, and it detects that your contract is Pausable, which means you can use Defender to pause our contract if you want.
Transferring Ownership to the Multisig
Right now, your NFT contract has the wallet address you used to deploy it set as its current owner.
Multisig ownership is more secure, so we will transfer ownership to the multisig created earlier. To do this, select New Proposal then Admin Action.

Here, on the right side of the screen, you can see the current state of the contract. It's not paused, the owner is your wallet address, and the totalSupply is zero since we haven't minted any tokens.
Click the Function dropdown and select transferOwnership. Under newOwner, select the name you gave the multisig.
Below this, you'll see Execution Strategy. What's that, you ask? Defender is just asking you how you would like to make this transaction happen.
If your contract was owned by a governance contract, as with a DAO, you would select Governor, so that transactions would run if they were passed in a vote. Typically, that would be done in tandem with a timelock, which applies a preset delay in transaction execution. To do this, you would select Timelock.
We aren’t using a timelock or a governor, so our execution strategy is rather straightforward.
In general, if you ever come to something that has you scratching your head, search the documentation and the answer is probably there. In Defender, you will find a link to it at the bottom left.
Select EOA for externally owned accounts. Ensure that the same wallet used to deploy the contract is currently connected to Defender and set to be on the Rinkeby network. Since this account owns the contract, we have the ability to run this onlyOwner function. After transferring ownership, only the multisig can run such functions.
Under the proposal title, give a friendly description to make it clear what you intend to accomplish here. "Transfer ownership to multisig" would suffice.
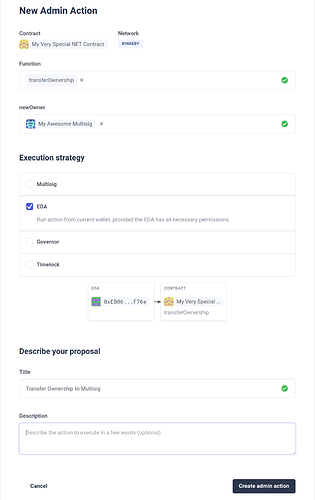
Select Create admin action and you will see that this transaction (with the friendly title you just supplied) is pending approval.
This screen is a bit like viewing your shopping cart before you actually make a purchase. That is good, since transferring ownership is a significant decision.
Select Approve and Execute. You'll have to sign (and pay for) the transaction in Metamask and then it gets executed. In the future, when running transactions for this contract you will still need to use Metamask, but the process will work a bit differently since the contract is now owned by a multisig.
Mint a Token
To mint a token using Defender, you’ll run another Admin action.
Select Admin → {Your NFT Contract}.
Under Proposals, you’ll see the transfer ownership transaction just executed.
Select New Proposal → Admin action.
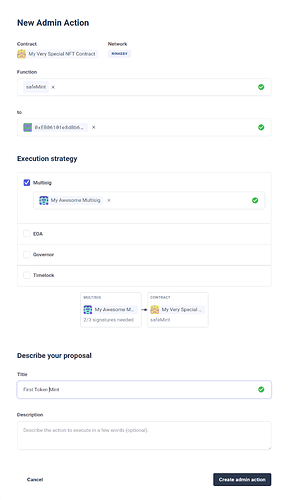
Under Function, select safeMint. You’ll mint a token to the contract’s previous owner to say thanks for deploying the contract.
For execution strategy, select Multisig along with the multisig managed by Defender that is the current owner.
Defender shows us that your multisig has three addresses and that you need at least two to approve the transaction for it to go through.
Describe the proposal as your first mint and select Create admin action.
On the next screen, review the admin action and select Approve.
To actually make this multisig transaction happen, you’ll need to sign the transaction with two of the three accounts belonging to the multisig. Accounts belonging to a given multisig could be wallets anywhere across the world. It just happens that you are managing them all in one place here.
In Metamask, switch to an account in the multisig, select Approve, sign, switch to the second account, sign, then select Approve and Execute. (Once the transaction has been signed by two, it can be executed by anyone, including the account that just signed.)
You have successfully minted your first token. To see this on the blockchain, select the contract’s address and paste it in Rinkeby Etherscan (or simply hover over the contract address and select View in Block Explorer) .
In Transactions, note the transfer of ownership.
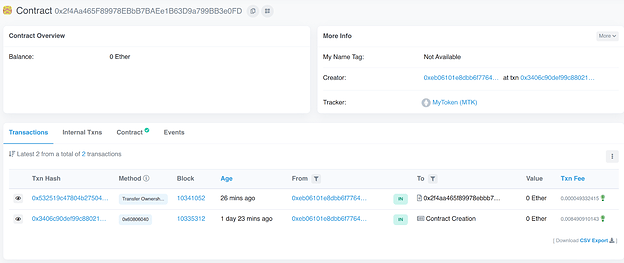
In Internal Txns, you’ll see the mint transaction. Selecting the parent transaction takes you to the transaction details, where you can see that Tokens Transferred was the token ID zero to the same address that deployed the contract.

Congratulations! You have successfully deployed an ERC721 contract, transferred ownership to a multisig, and minted a token to an externally-owned account. From here, feel free to experiment further with Defender. See what happens if you pause your function and try to mint another token.


