


This article is a detailed walkthrough of how to build/run a minimal React Dapp that deploys and interacts with a simple Solidity smart contract using Hardhat and MetaMask as part of one’s development workflow.
Why this article? In the Ethereum Developer Bootcamp at ChainShot we use Hardhat and MetaMask daily in class, so I wanted to write an article introducing them.
There is lots to cover, so let’s dive in!
Table of Contents
- Introduction
a. Prerequisites
b. Disclaimer
c. Why another ‘Build a Dapp’ article?
d. What you will be building/running
e. The tools you will use - Tools & Setup
a. CLI Tools & Hardhat
b. MetaMask Installation & Configuration - The Greeter Dapp
a. Connecting MetaMask to the Dapp
b. Using MetaMask to Cryptographically Sign Digital Messages
c. Deploying an Instance of the Greeter Dapp
d. Writing to Your Local Ethereum Blockchain - Going Further!
Introduction
Prerequisites
This article assumes the reader has a basic working knowledge with command-line terminals, Node JS, GitHub and git CLI tools.
Disclaimer
This article is for educational purposes only and the use of the MetaMask browser extension in the context of this article is solely for development purposes. We will not be interacting with real money, nor live blockchain networks. We will be using a local test network only. For this reason, we will be a bit lax here in terms of best security practices.
For any testing, tinkering or development work I’d strongly recommended you install the MetaMask extension in a separate browser from a browser you might potentially use on any live nets with real money. This will help ensure you don’t accidentally end up using imported test accounts on a live net.
⚠️ If you plan to use the MetaMask browser extension on live networks with real money, please do your own research on how to do this securely as blockchain security is a big topic outside the scope of this article.⚠️
Why another ‘Build a Dapp’ article?
There are many articles about building a Dapp already out there as you have may already seen.
However, while many of the articles are quite good, some are a bit dated and I wasn’t able to find any articles that combine all the pieces together that I see being used in modern DeFi projects.
This article will specifically use the following technologies all together:
- Hardhat
- MetaMask
- ethers.js
- React
- Typescript
- The web3-react npm package
- Other peripheral tooling such as eslint and prettier
You will find all of the above technologies currently used in the biggest DeFi protocols. Don’t worry if you aren’t familiar with all these things. They will be covered in more detail below.
What you will be building/running
The end goal will be to build a Dapp with a UI that looks like this:
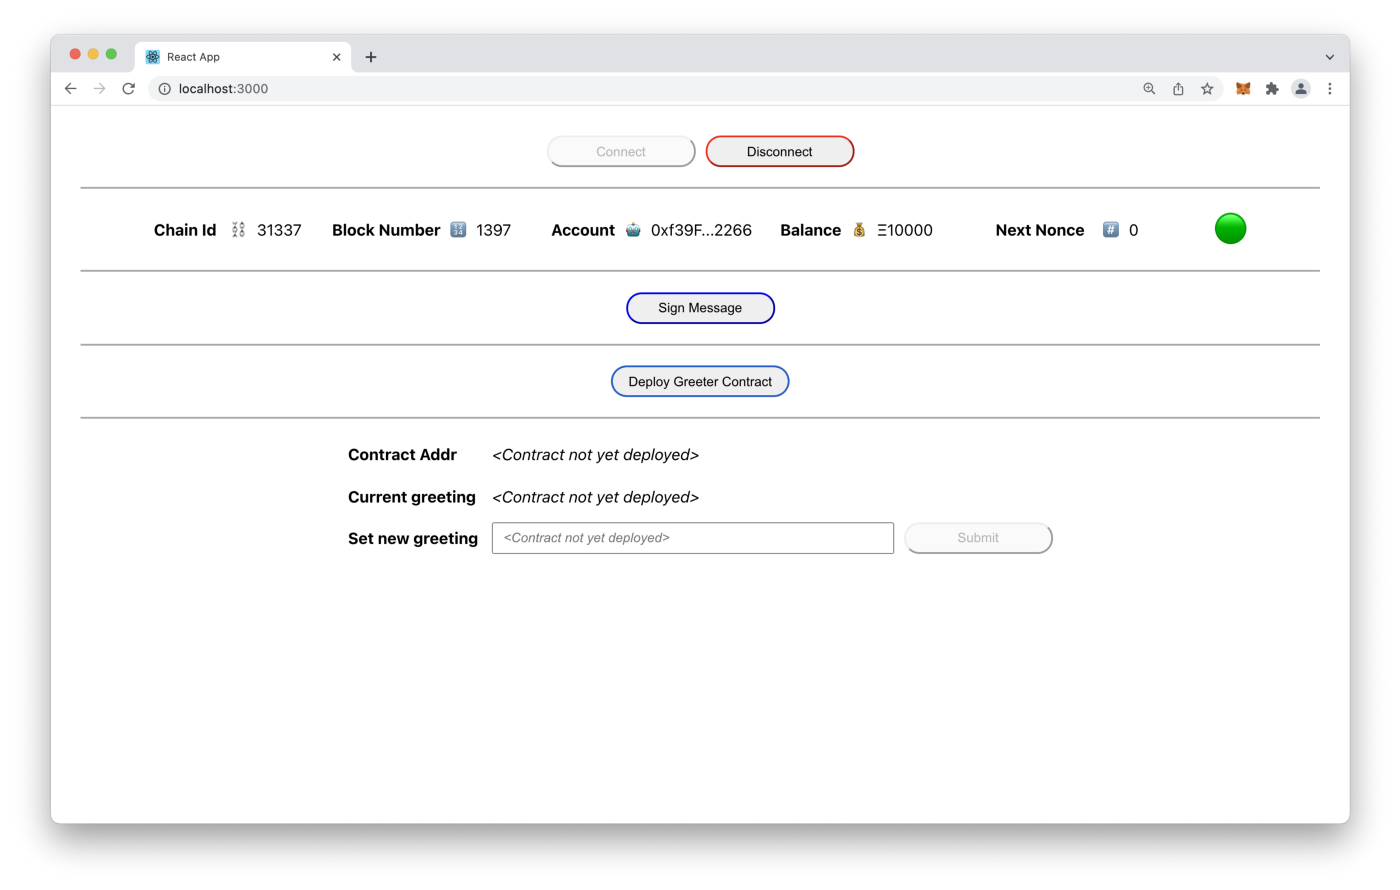
The Dapp is very simple and uses a trivial ‘Greeter’ smart contract that allows you to read a greeting from and update the greeting on your local blockchain. The ‘Greeter’ smart contract is a simple smart contract that Hardhat automatically creates as a starter contract when a new Hardhat project is created.
The Dapp in the screenshot above demonstrates the following functionality:
- How to connect a Dapp to the blockchain via Metamask
- How to read account data from the blockchain via Metamask
- How to cryptographically sign digital messages via Metamask
- How to deploy a new instance of a smart contract via Metamask
- How to read and write data to and from the deployed smart contract.
The tools you will use
Hardhat is a set of tools that facilitates developers in running a local Ethereum development blockchain, writing Solidity smart contract code, running smart contract tests, and debugging Solidity code, all without dealing with live Ethereum blockchain networks. You’ll use Hardhat to run your own local Ethereum test network.
MetaMask is an Ethereum-based cryptocurrency wallet browser extension compatible with the most common web browsers. It allows users to interact with a variety of Ethereum networks. You’ll use it to facilitate communication between your Dapp and your local Hardhat node.
Additionally, you will use the git CLI tool to pull down the example code from GitHub. You will also install and use node and yarn to build, compile and run the smart contract and frontend Dapp. You will also use a Terminal window to use the CLI tools.
Tools & Setup
CLI Tools & Hardhat
To kick things off, install the tools you’ll need and grab the example code. You’ll need to have node and npm(Node JS) and yarn installed on your system.
For instructions on how to install node and npm follow the instructions here: https://nodejs.org/en/download/. For the purposes of this article, install v16.13.1 of node.
Also install git using these instructions.
With the tools installed, create a new Node JS / Hardhat project. To do this open up a Terminal window and cd into your preferred local development directory. Then run the following commands:
The final yarn hardhat node step is important to do now, as it is necessary to have a local Hardhat network running before installing and configuring the MetaMask browser extension for Hardhat!
Once you have Hardhat network running you’ll see output in your terminal similar to:
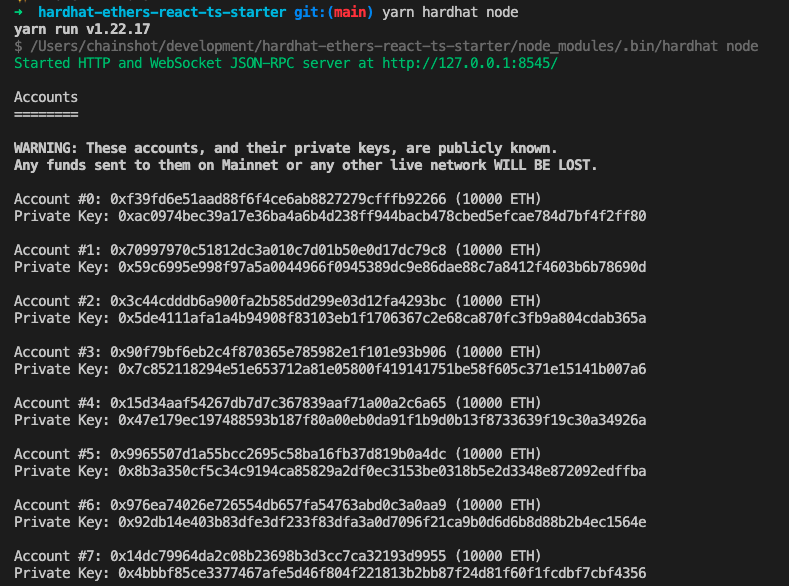
Take notice of two things in the output:
- Your local Ethereum network is running locally on port 8545.
- You can see several pre-created Ethereum test accounts with their public addresses, private keys and the fact that each account has been given 10000 test ETH.
⚠️ These are test accounts only and their private keys are publicly known. Never use these accounts on live Ethereum networks, nor store real money in them! ⚠️
Now copy test Account #0’s private key and store it in your favorite text editor (An excellent free editor/IDE is VSCode). You will come back to this private key later when you set MetaMask up.
If you’ve set things up correctly the important directories and files are in the following places outlined below:
Great! With the Hardhat project created and your local Hardhat Ethereum network running, you are halfway to the goal. 💪
MetaMask Installation & Configuration
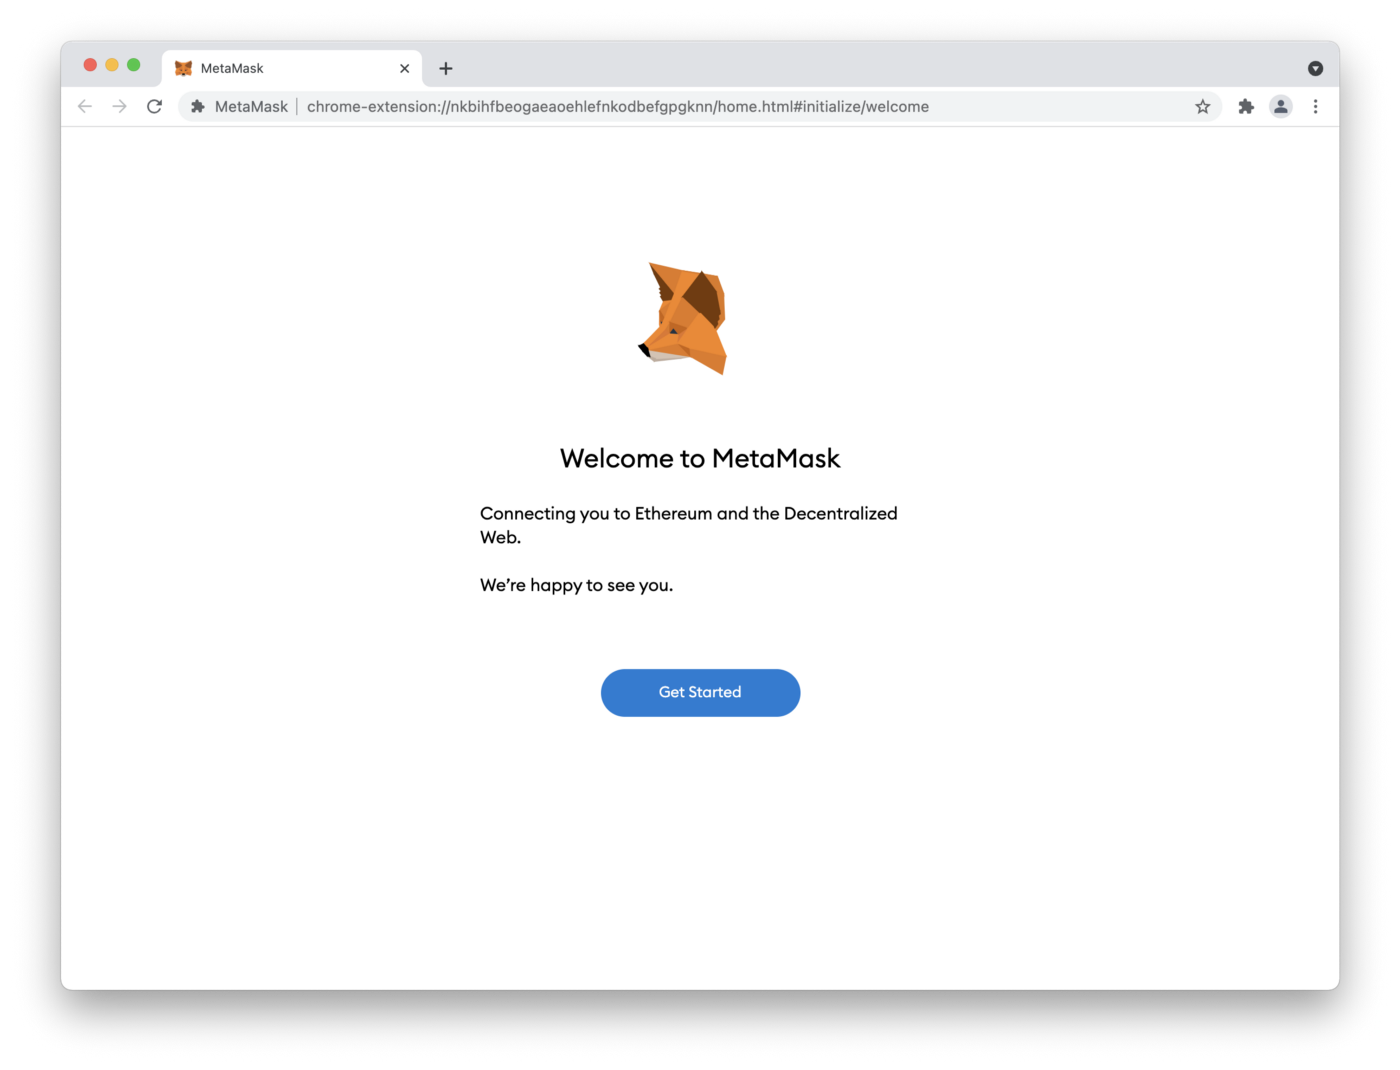
Visit MetaMask’s website to install the extension. Click on the ‘Download’ button and follow the directions to install MetaMask as an extension for your browser.
Once the extension has been installed you will be greeted with a Getting Started screen in your browser to setup the extension. Click on the ‘Get Started’ button and follow the instructions from there for the initial setup of MetaMask. Refer to MetaMask’s website for further details.
If all is setup correctly you’ll see the following page in your browser (with a different address from the one in the screenshot):
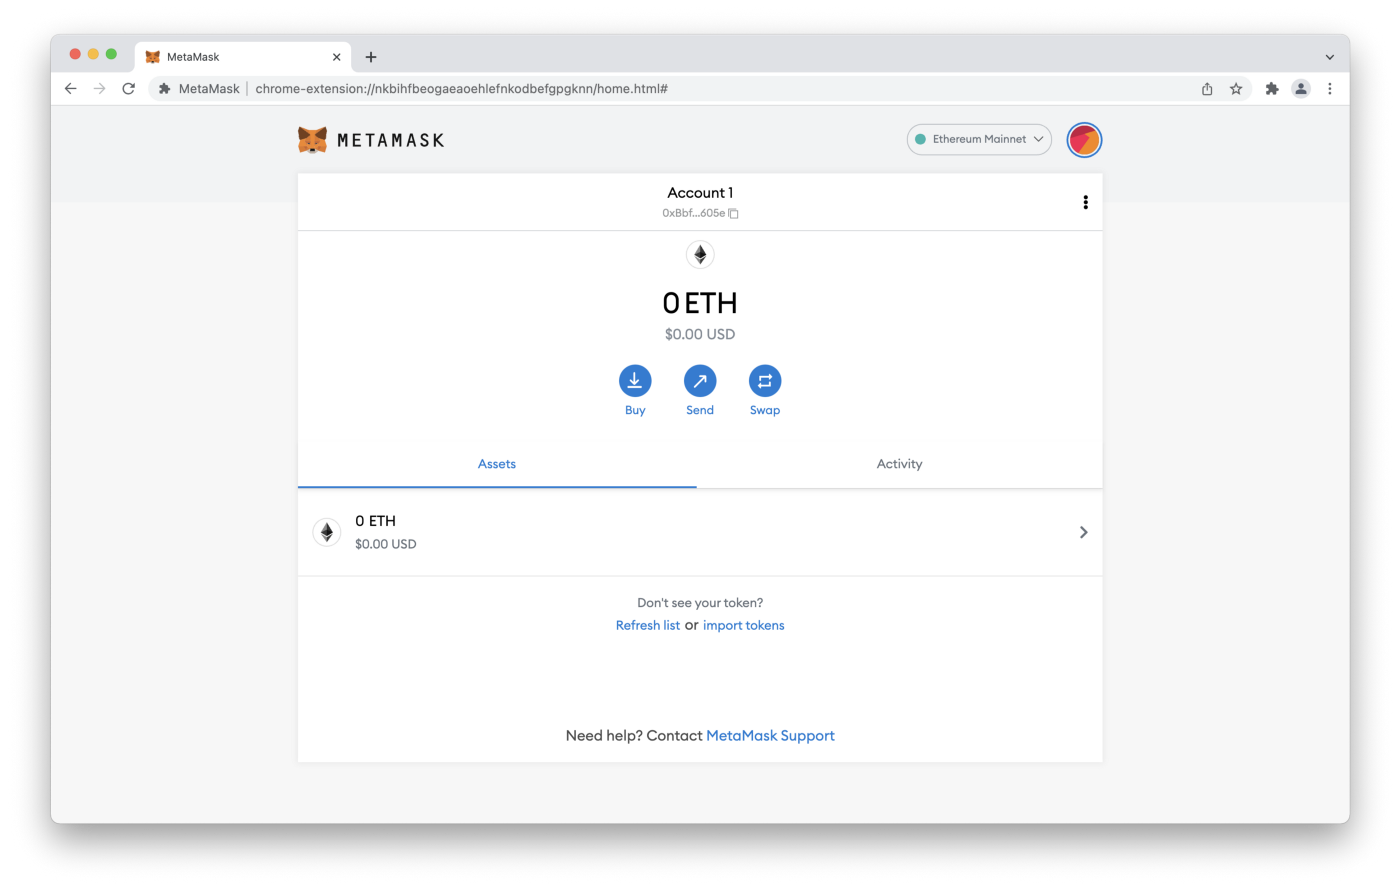
Next configure a few things in MetaMask.
Click the ‘Ethereum Mainnet’ button in the upper-right hand part of the screen just to the left of the circular identicon image to open the network dropdown box. Click the ‘Show/hide’ test networks button to show test networks which will take you to an ‘Advanced’ settings page.

From there turn ‘Show test networks’ on. Also turn on ‘Customize transaction nonce’.
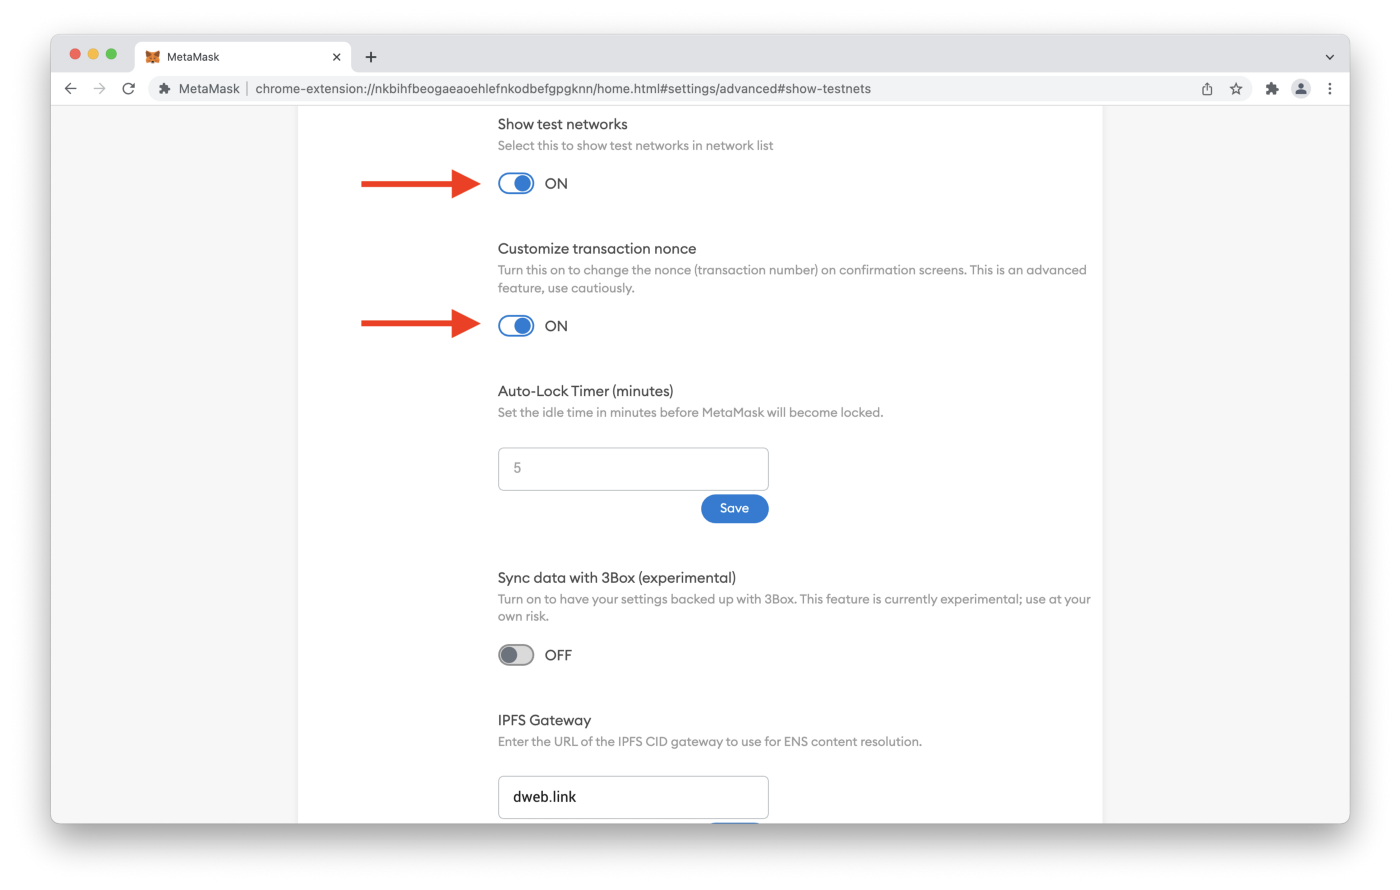
Turning on the ‘Customize transaction nonce’ setting is not strictly necessary, but is very helpful during smart contract development (more details on this below).
What is a nonce, by the way? 🤔
The definition of an account nonce taken verbatim from ethereum.org’s description is that an account nonce is:
A counter that indicates the number of transactions sent from the account. This ensures transactions are only processed once. In a contract account, this number represents the number of contracts created by the account.
👉 There is another type of nonce , a block nonce, which we won’t discuss here, but you should be aware of it as not to confuse the two. You can read more about block nonces on ethereum.org’s website . 👈
The reason it is helpful to turn the ‘Customize transaction nonce’ setting on is because every time you restart your local Hardhat node (aka network, aka local blockchain), this will reset your account’s nonce to 0. However, MetaMask will still have the old, latest nonce you used. When you submit a new transaction in MetaMask after restarting your Hardhat node you’ll need to set the ‘CUSTOM NONCE’ in the MetaMask dialog box to 0 (or whatever the correct current none value is — the simple Dapp you will be working with will alert you if you are using the wrong nonce).
The next MetaMask configuration will be to adjust the Localhost:8545 ‘Chain Id’ setting to the chain id that the local Hardhat network is running on.
Open up the Settings page again and click on Networks in the menu on the left.
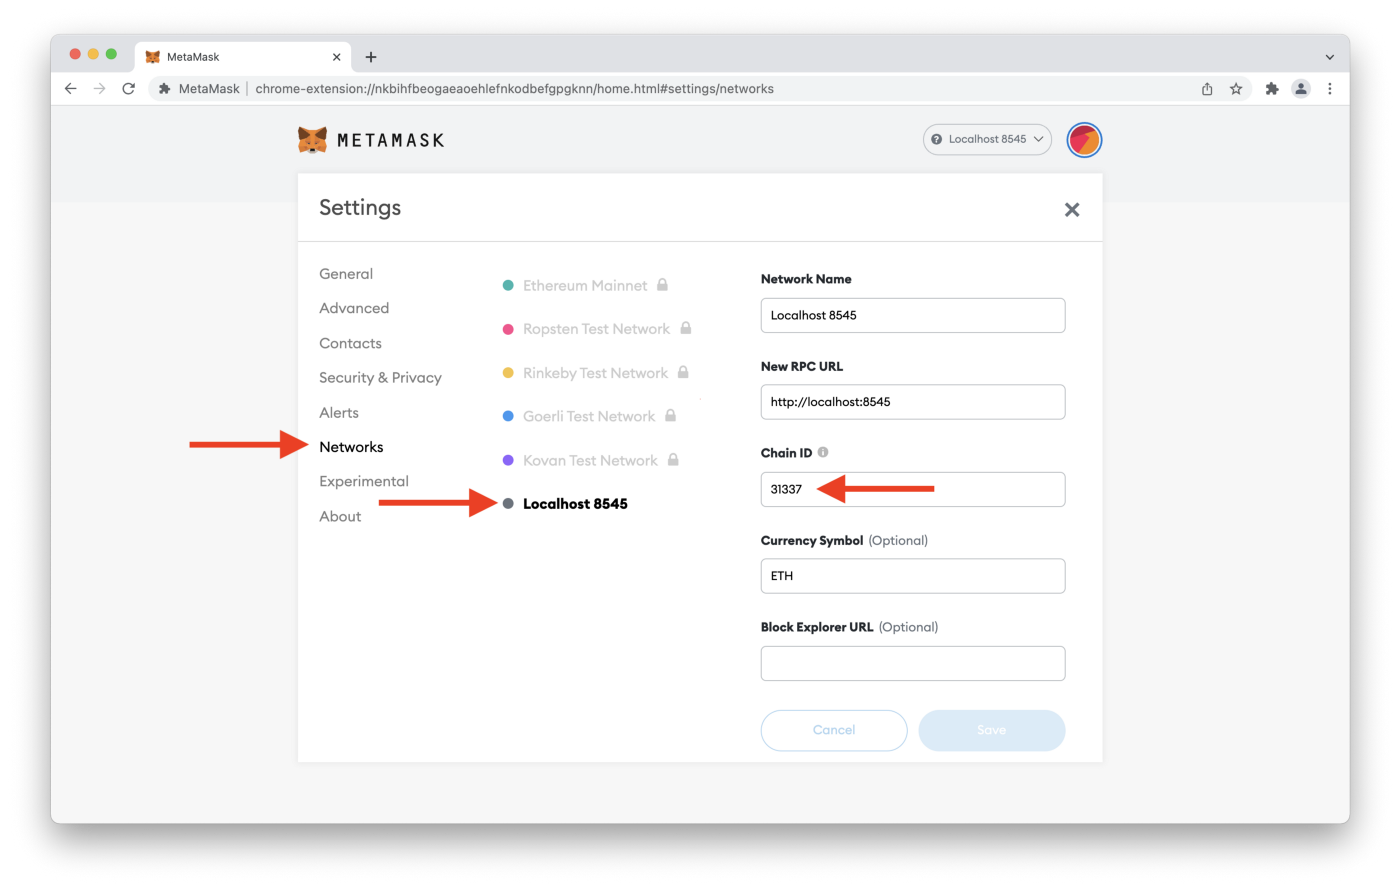
On this screen click on the Localhost:8545 network and then change the Chain ID to 31337. This is the Chain ID that the Hardhat network uses when you started the Hardhat network earlier. Note that the Hardhat node must be running for you to successfully be able to change the Chain ID.
After you’ve changed the Chain ID click ‘Save’. After saving the changes MetaMask’s Localhost network will be the currently selected network and it will be correctly configured to work with the Hardhat network.
Finally you need to import a Hardhat test account into MetaMask.
Exit out of the Settings menu and click on the circular identicon image again to open up the dialog menu and from here click on ‘Import Account’.
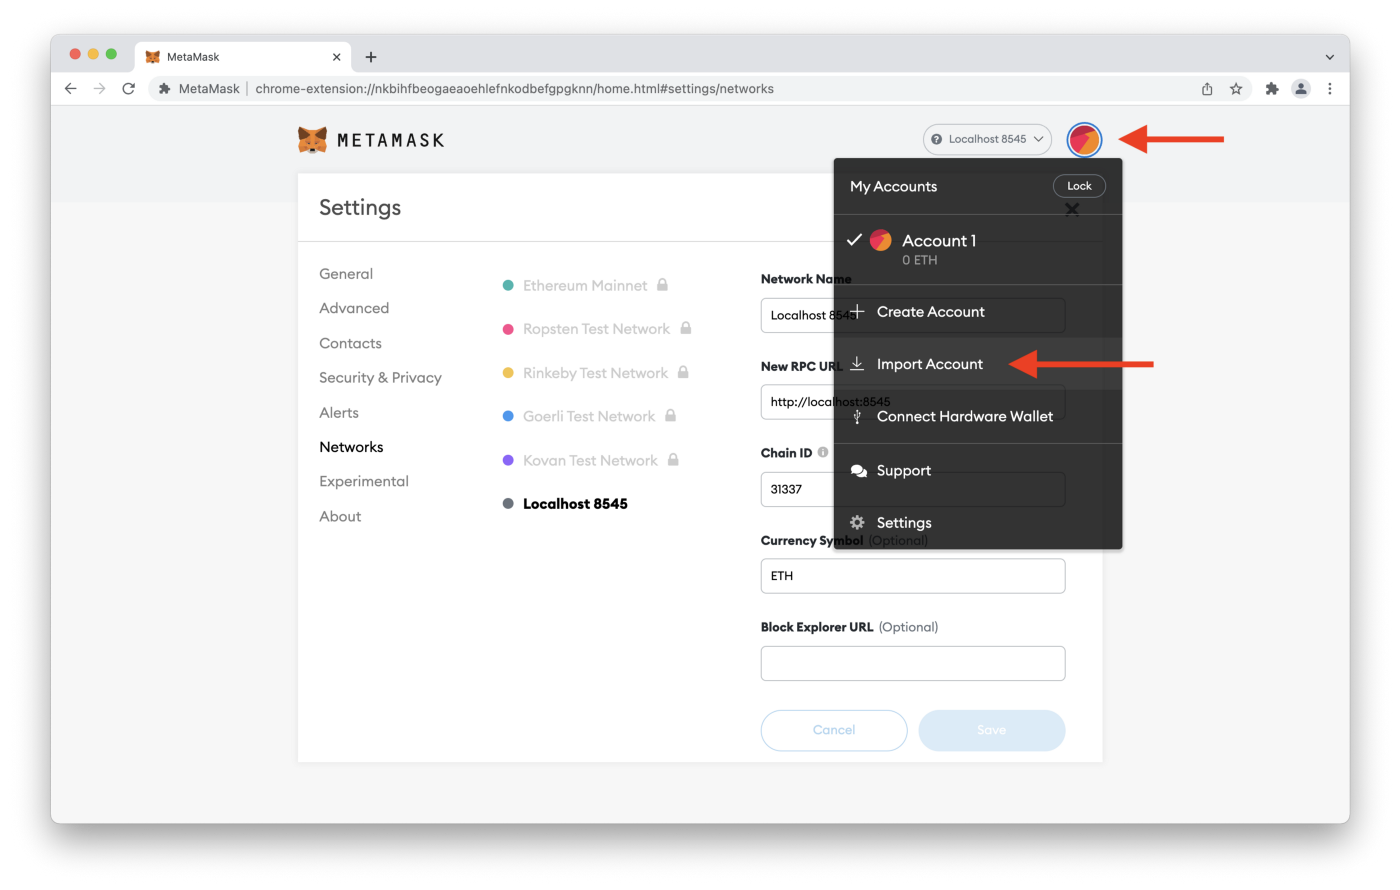
Here you’ll see the dialog below:
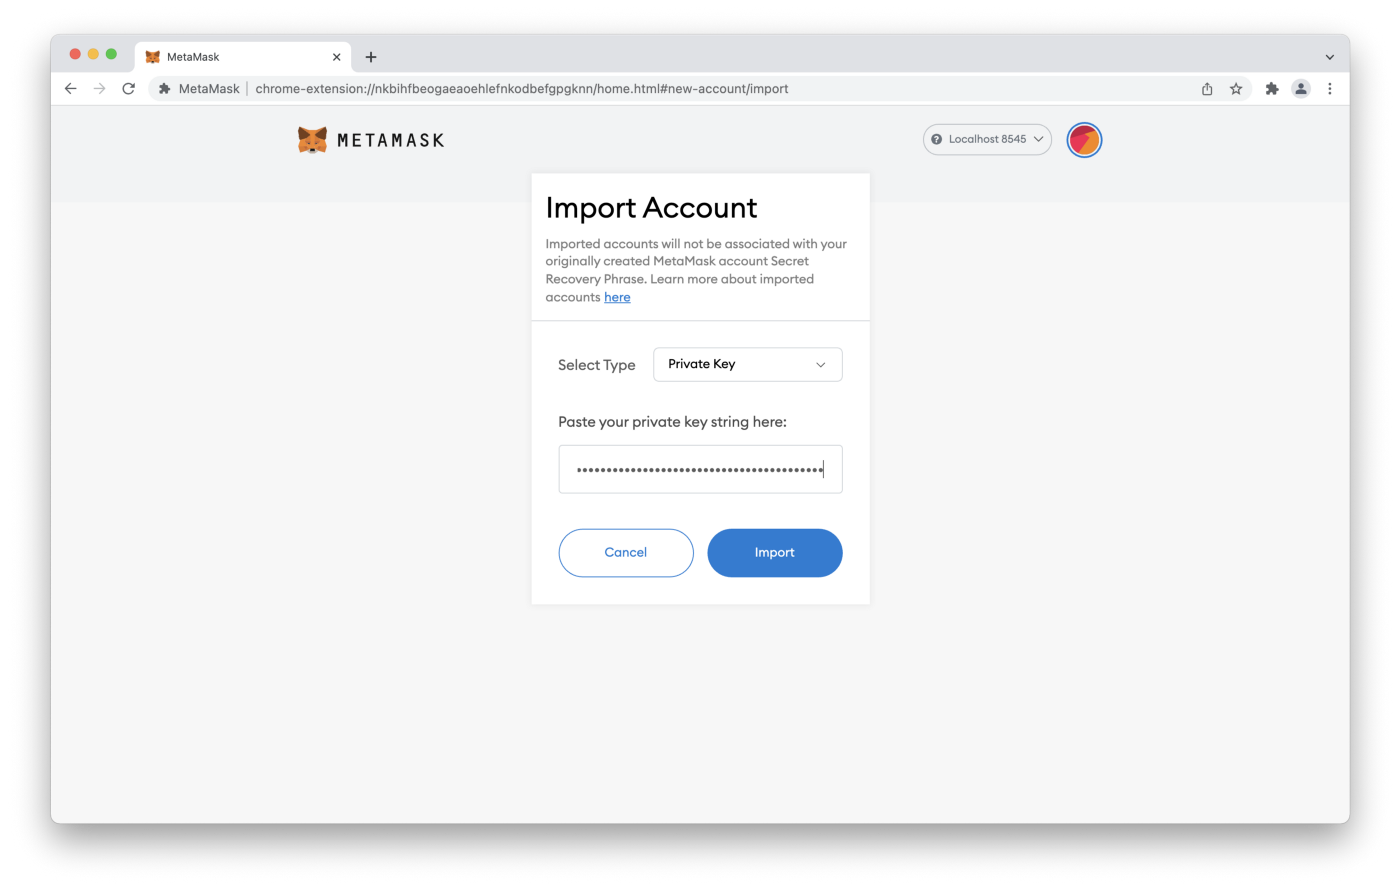
Remember the Private Key for the test account you copied down when you started up the Hardhat node? You will use that now.
From the MetaMask dialog box, select ‘Private Key’ from the dropdown and paste in the Private Key for Account #0 and click the ‘Import Account’ button.
⚠️ Using this test account is not secure at all! Only use this account for testing and development purposes on test networks. Remember, never use Hardhat’s test accounts with real money nor use these accounts on Ethereum’s mainnet! ⚠️
After importing the account you’ll see:
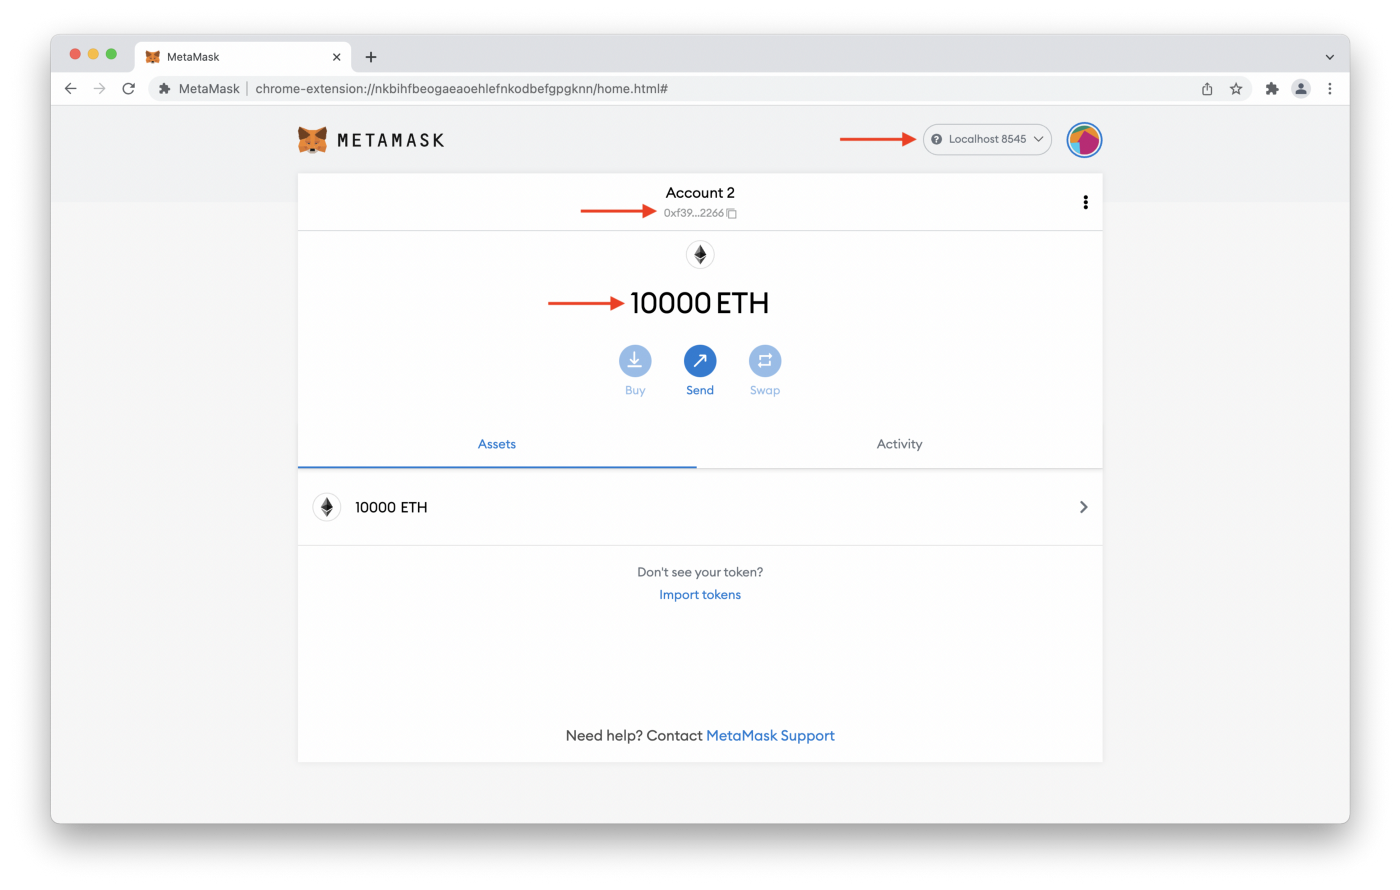
The 3 keys things to notice here are:
- the MetaMask plugin is connected to the Localhost:8545 local Hardhat node that is currently running.
- Account 2 (the one you just imported from Hardhat) is the currently selected account
- The account is funded with 10000 ETH (this is test ETH only unfortunately 😉)
With all these things in place there is 1 final step to go. Then you’ll be ready to deploy and interact with a smart contract in your browser via the MetaMask extension.
The Greeter Dapp
The Greeter Dapp is frontend React code that interacts with your local blockchain and smart contract code. The specific smart contract the Dapp will be interacting with is the contracts/Greeter.sol contract, the simple starter contract that initializing a Hardhat project creates. The code for the smart contract is:
To interact with this smart contract you need to start your frontend web server. The frontend code is called a ‘Dapp’ because it is the ‘application’ code that talks to the ‘decentralized‘ blockchain. Get the frontend up by opening up a Terminal window, cd'ing into the project directory and running following commands:
If all goes well a new browser window should open automatically with the URL localhost:3000 (if a browser window doesn’t open, open a window and type in the URL into the browser manually). And from here you can see your running Dapp.
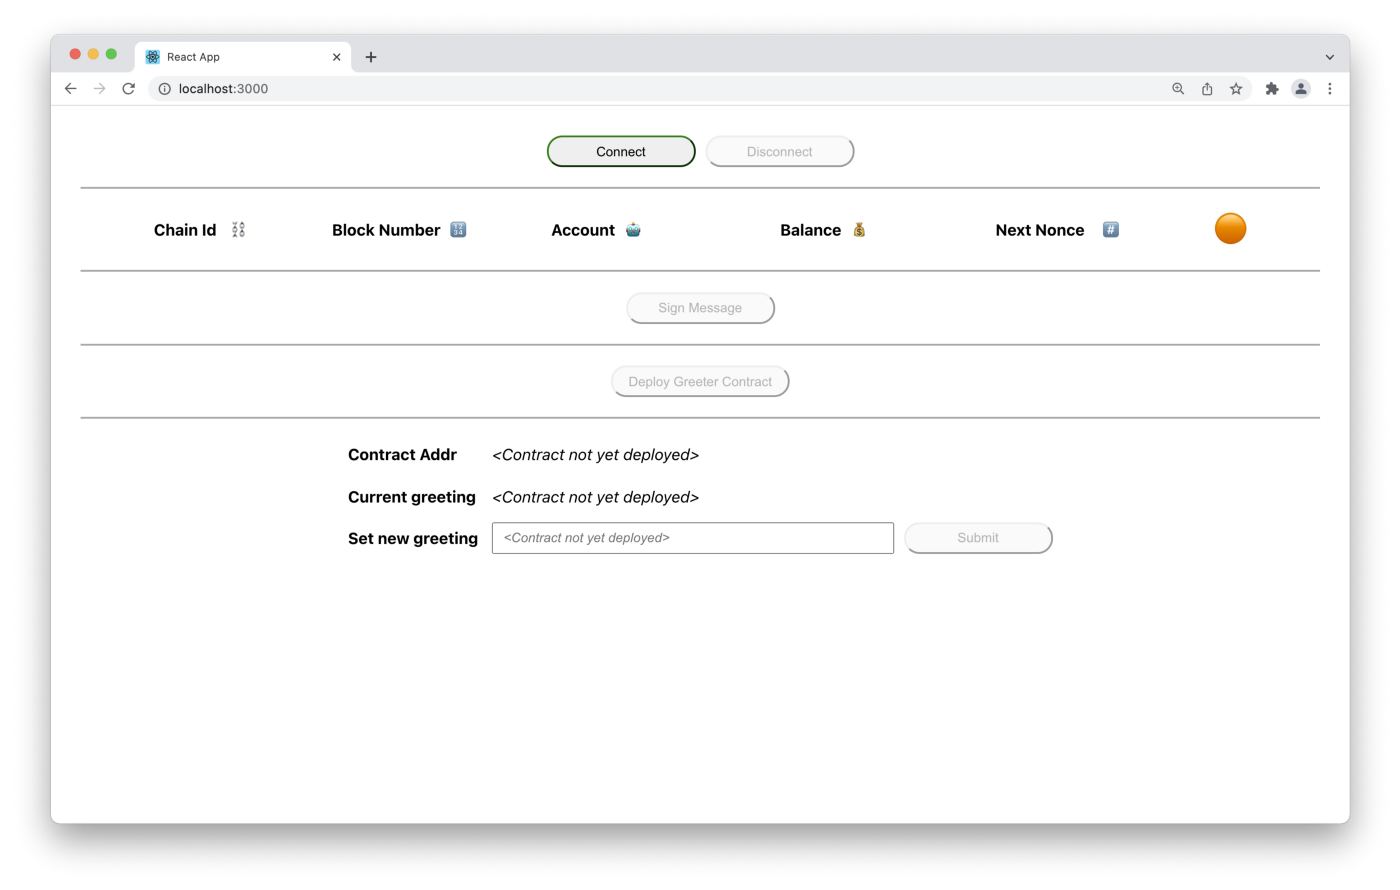
Connecting MetaMask to the Dapp
Here you can see your MetaMask wallet is not yet connected to your Dapp, so you can’t yet interact with it. Go ahead and click on the Connect button and select Account 2 (the account you imported into earlier) from MetaMask’s dialog box.

In the MetaMask dialog window click ‘Next’, and then click ‘Connect’. This will connect your MetaMask wallet to your Greeter Dapp frontend, which will communicate with the Greeter.sol smart contract. Have a look now.
🌟🌟🪄 Voilà! 🪄🌟🌟
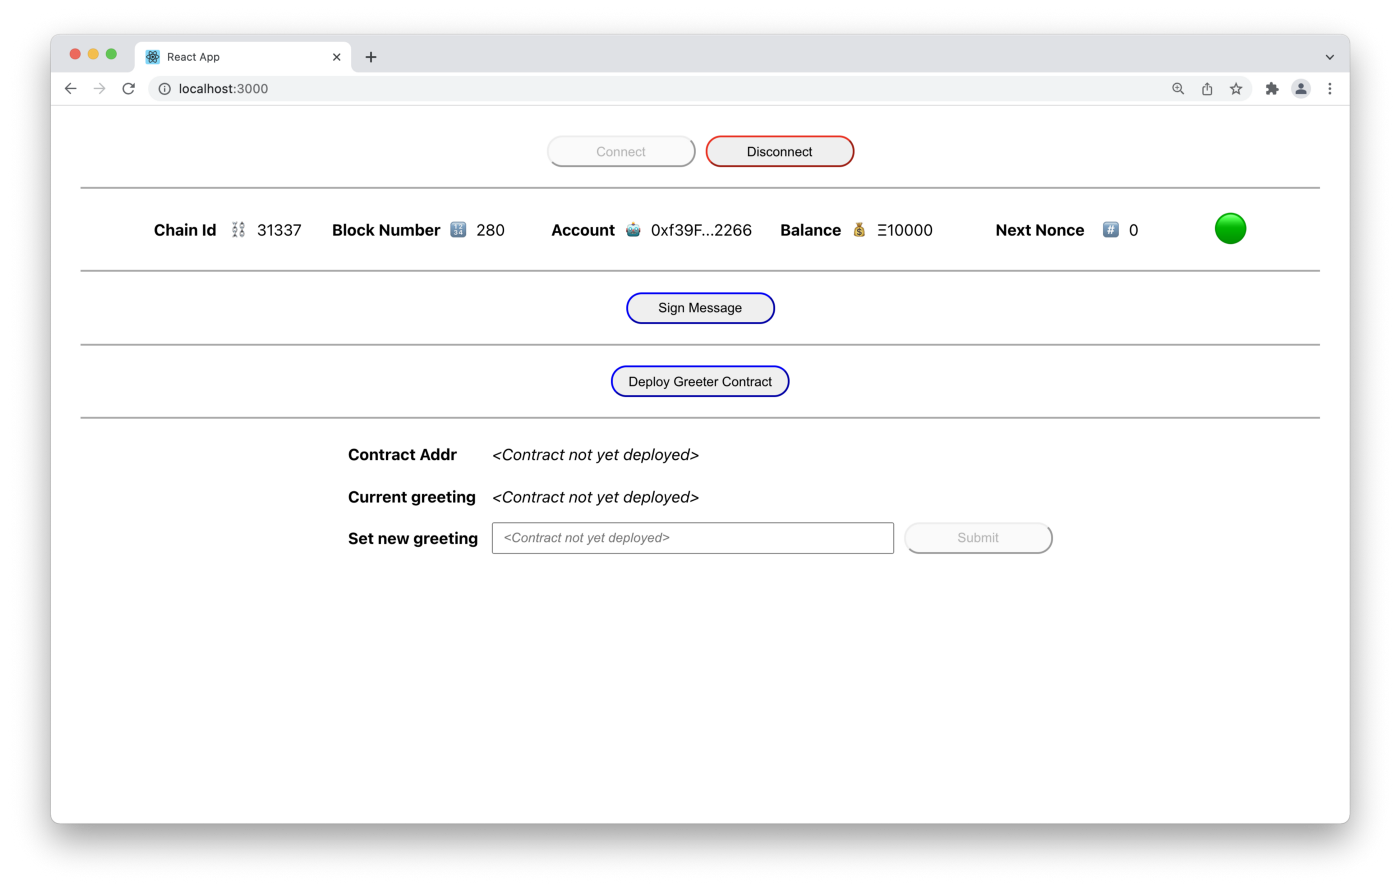
You can see information about your locally running blockchain and your MetaMask account, including which chain id your account/wallet is connected to, the current block number, the address of the connected account, the account balance, and the account’s next nonce. You can also see there is no deployed Greeter.sol smart contract (yet! — we’re getting there).
Using MetaMask to Cryptographically Sign Digital Messages
An important part of using blockchain technology is the ability to cryptographically sign digital messages. The metaphor is very direct. It’s like writing a letter to someone and signing it with your name. Your signature let’s the recipient verify that the letter was really written by you. Click the ‘Sign Message’ button in your Dapp and you’ll be prompted with another MetaMask dialog.
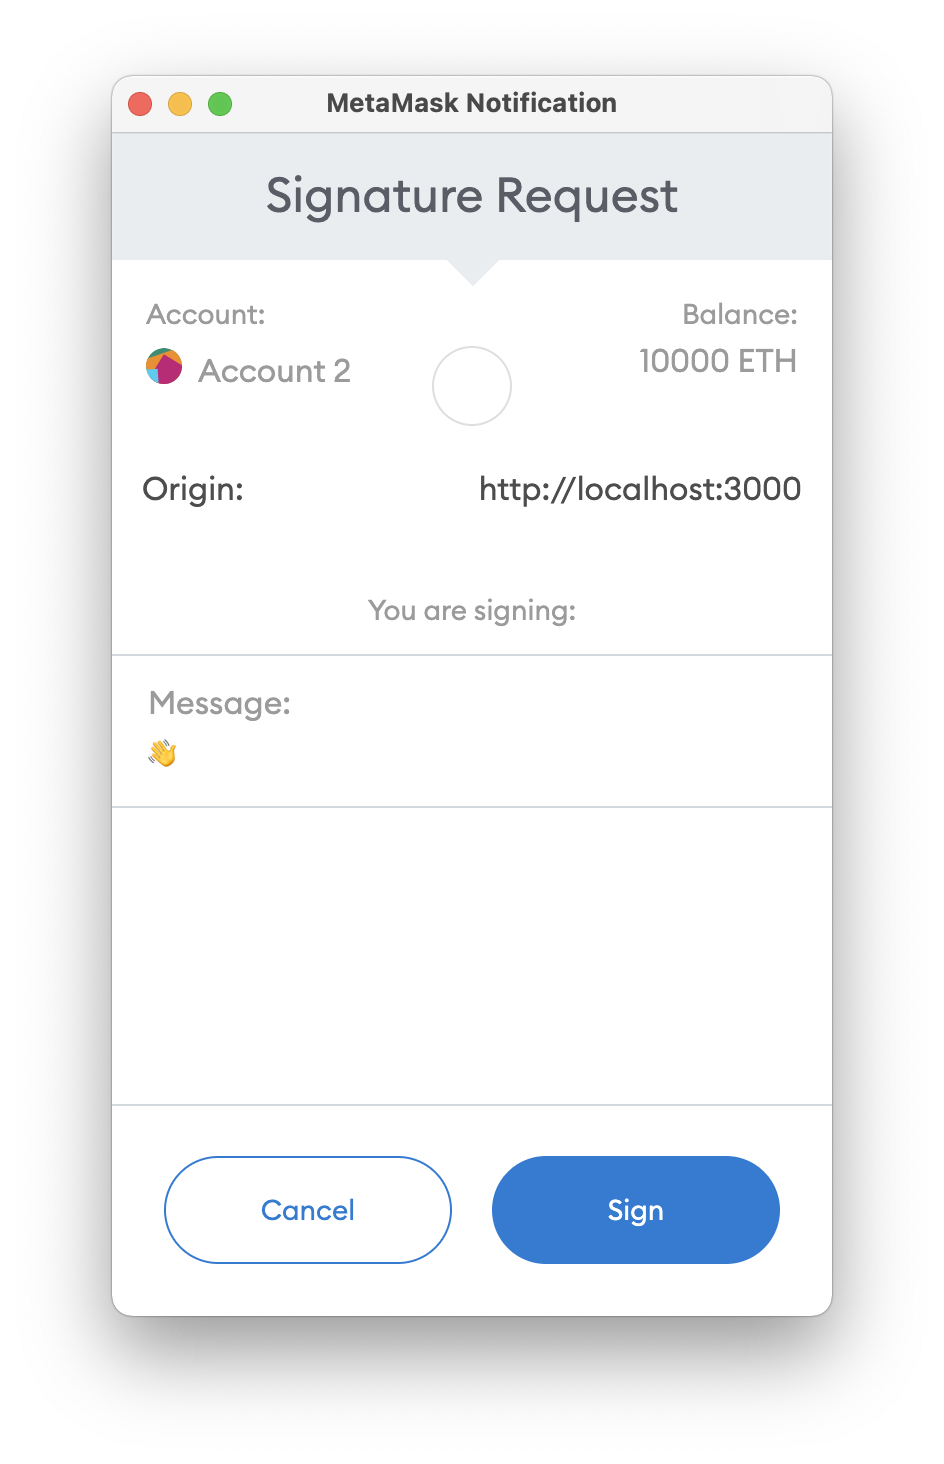
Notice 2 things:
- MetaMask is prompting you for a Signature Request
- The message you are asked to sign is: 👋
(yes it’s just a ‘wave’ emoji, a bit silly, but that’s the value coded into the frontend and it serves our purposes well)
Click the ‘Sign’ button at the bottom of the MetaMask dialog to sign your ‘wave’ emoji message and you’ll see a response from the Dapp come back.

Cool! The frontend code end has successfully used your connected MetaMask account to sign a digital message. ✍️😎
👉 Note that signing messages and creating transactions on the blockchain (which you’ll do next) are not the same. Signing messages doesn’t cost gas and doesn’t create blockchain transactions. Look in the UI and you’ll see that the Next Nonce value is still 0, which means you haven’t made any transactions yet. 👈
Deploying an Instance of the Greeter Dapp
Before you can interact with the Greeter.sol smart contract you’ll need to deploy an instance of the Greeter.sol contract to your local blockchain. To do so click on the ‘Deploy Greeter Contract’ button in the UI. Note the Nonce in the MetaMask is 0 (if it isn’t, change the value to 0, as this is your first transaction on your locally running node).
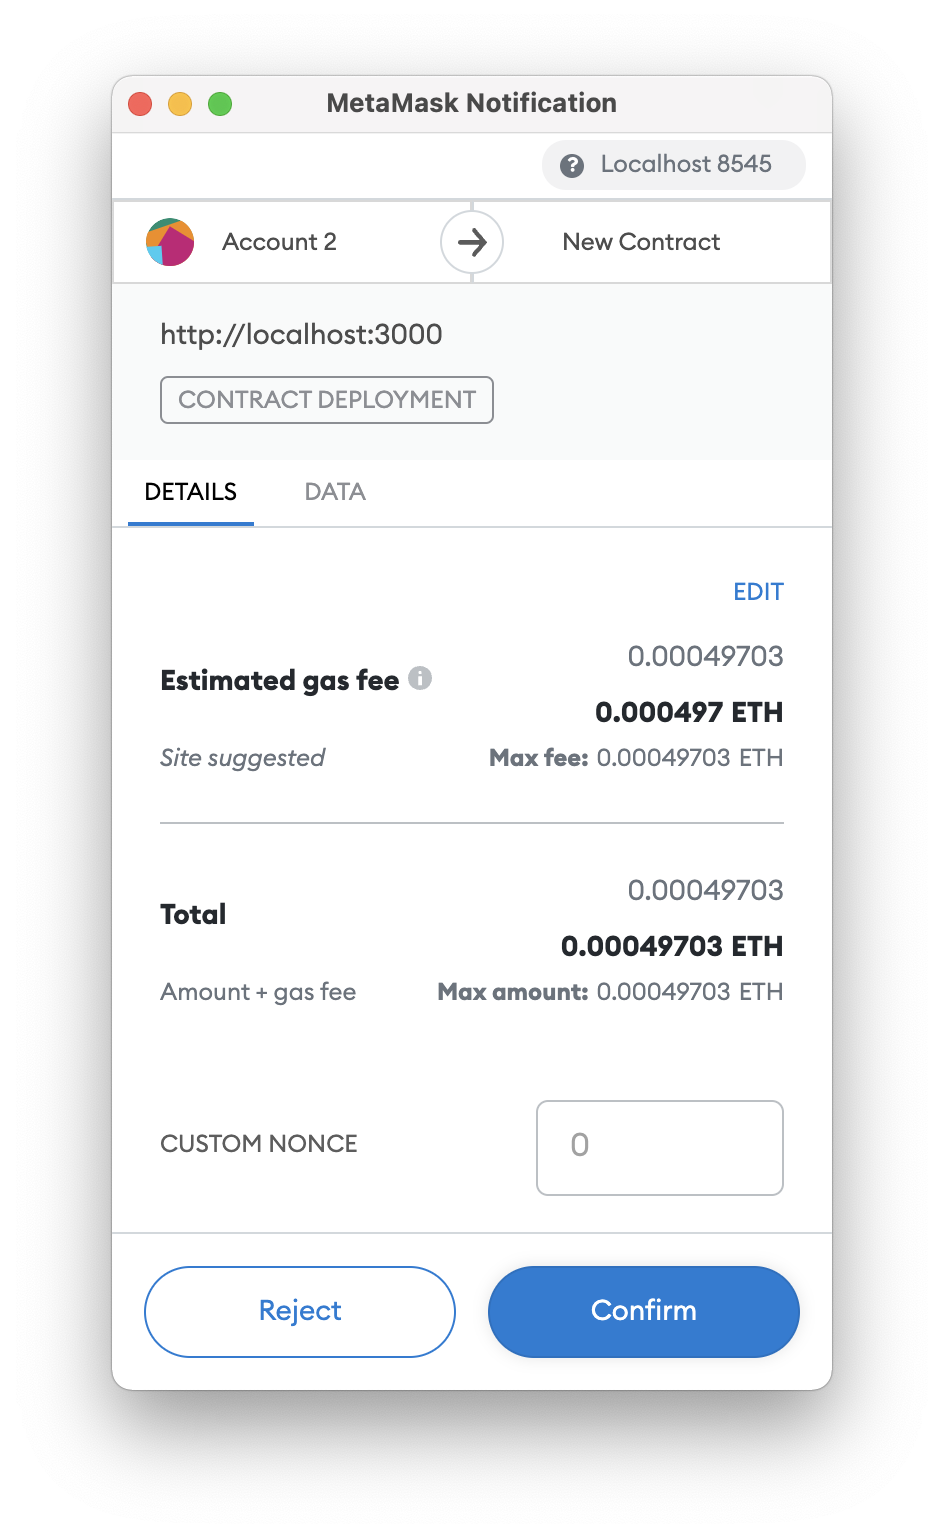
Deploying a contract creates a transaction because it updates the blockchain state. This means that deploying a contract will cost you some gas (test gas!) and will increase your nonce from 0 to 1.
Click ‘Confirm’ in the MetaMask dialog box and wait while the contract deploys to your local Hardhat node. An alert box will pop up, displaying your contract’s blockchain address. Click ‘Ok’ to close the pop up and, then have a look at the UI.
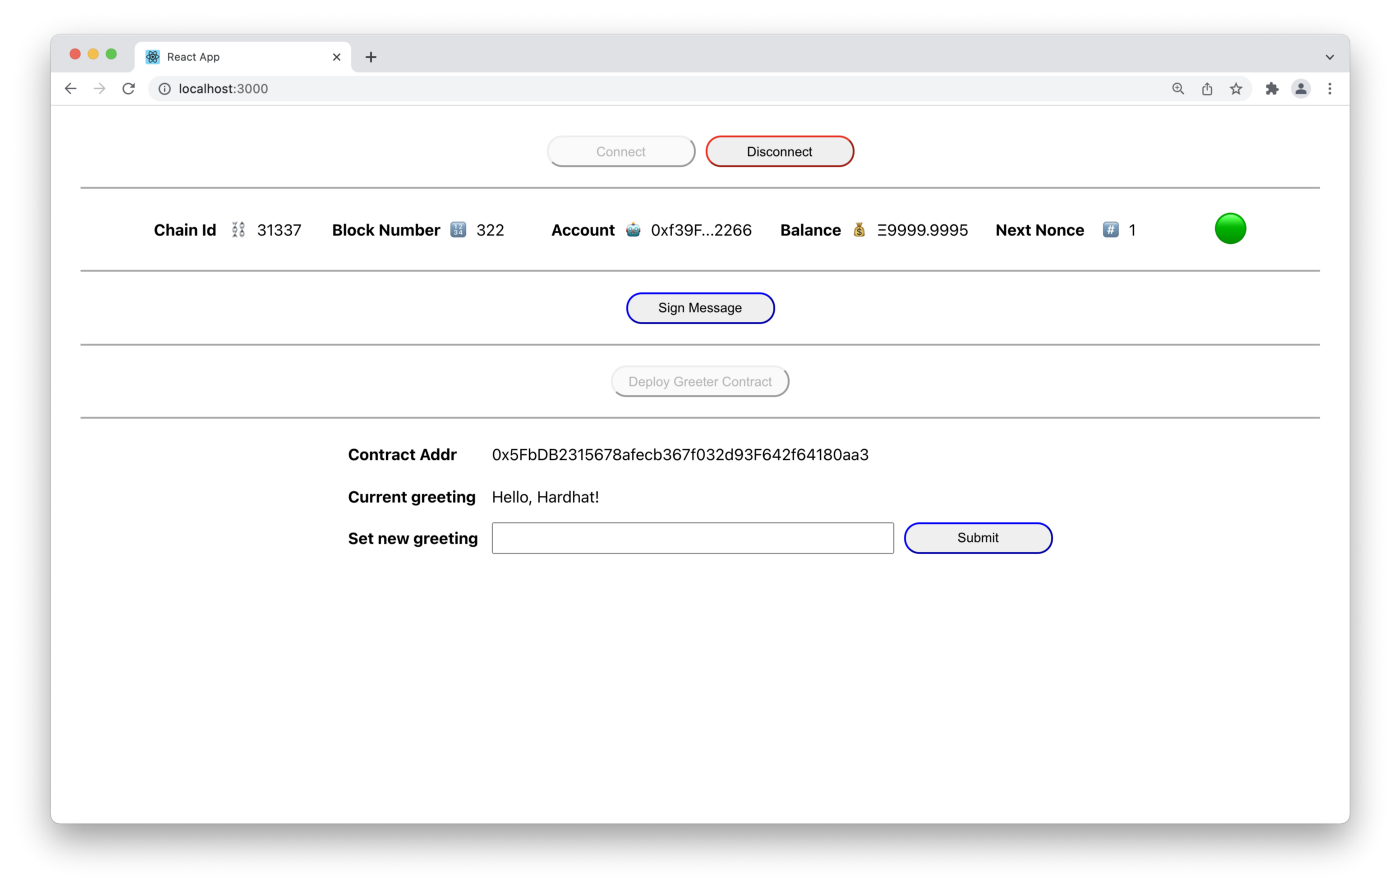
Looking at the UI from top to bottom you can see your account balance has decreased a bit since you spent gas on a transaction to deploy your contract. Also note that your ‘Next Nonce’ value has also incremented by one, since your account has made one blockchain transaction.
In the last section of the UI you can see details about the deployed contract. Namely, you can see the address of the deployed instance of the Greeter.sol contract and the state of the very simple contract, the contract’s greeting, which is initially set to Hello, Hardhat!.
Writing to Your Local Ethereum Blockchain
Technically, you’ve already written to the blockchain when you deployed the Greeter contract. But, just to be sure, let’s be a little more explicit. Let’s change the contract’s greeting to something else. Type a new greeting into the ‘Set new greeting’ input field and click ‘Submit’ which will bring up another MetaMask dialog box.
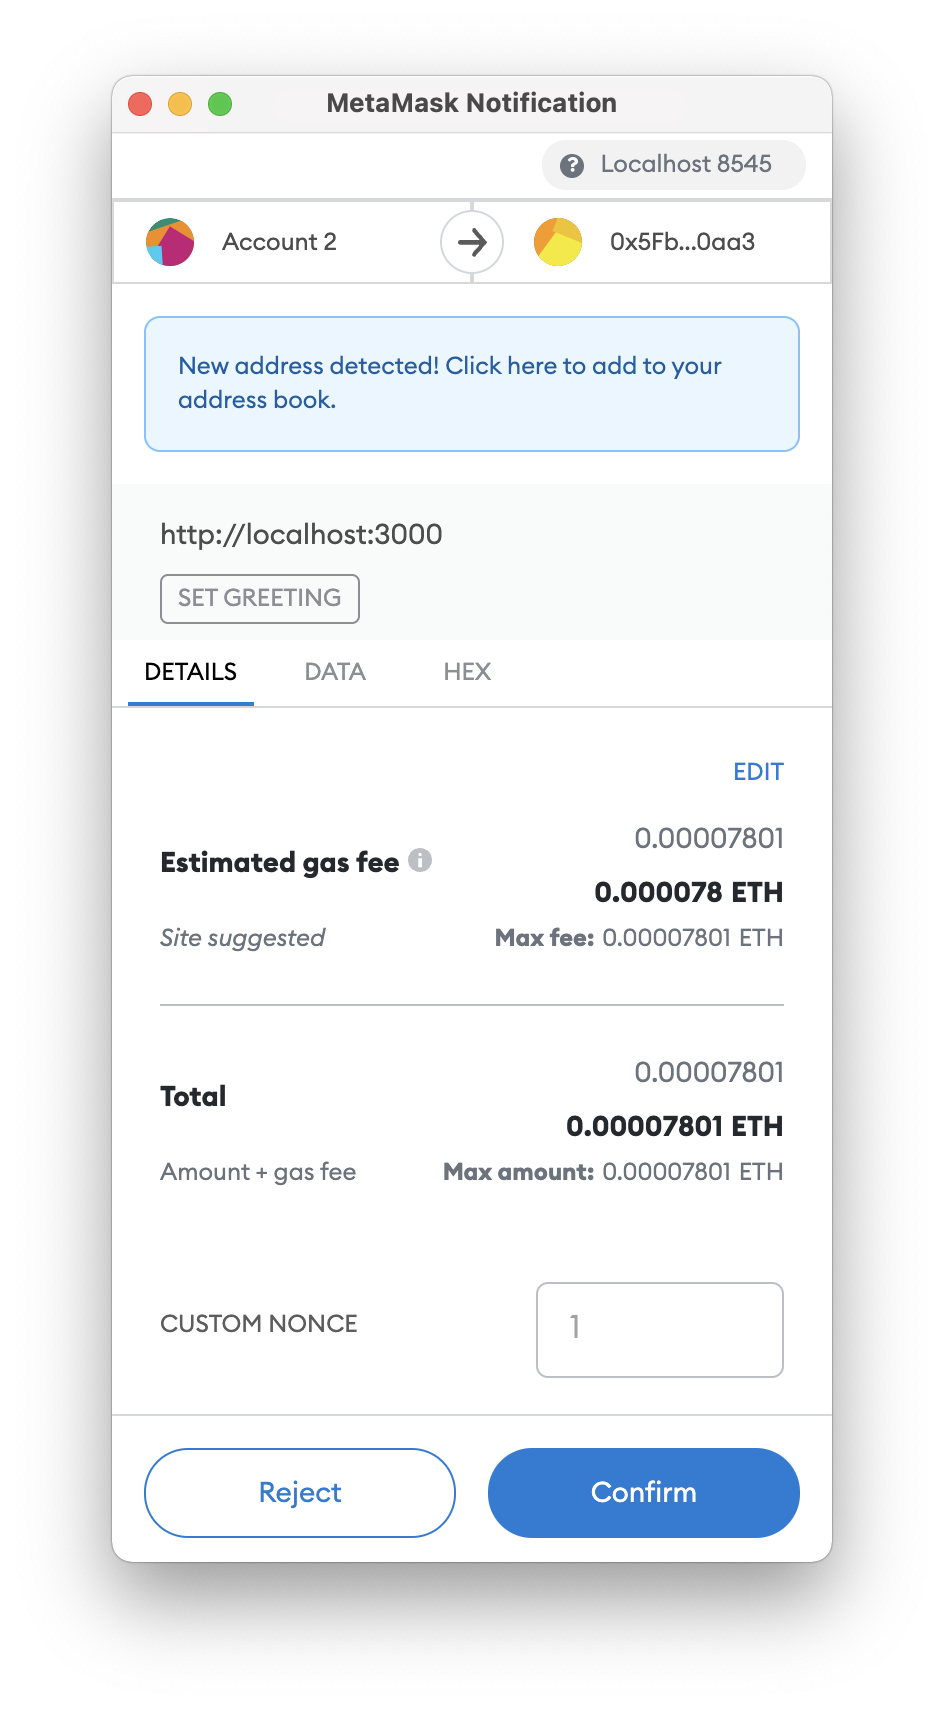
Click ‘Confirm’ in the MetaMask dialog box and wait for the greeting message to update on your local blockchain. If all goes well a pop up should appear notifying you the transaction was successful. Click ‘Ok’ and have another look at the UI.
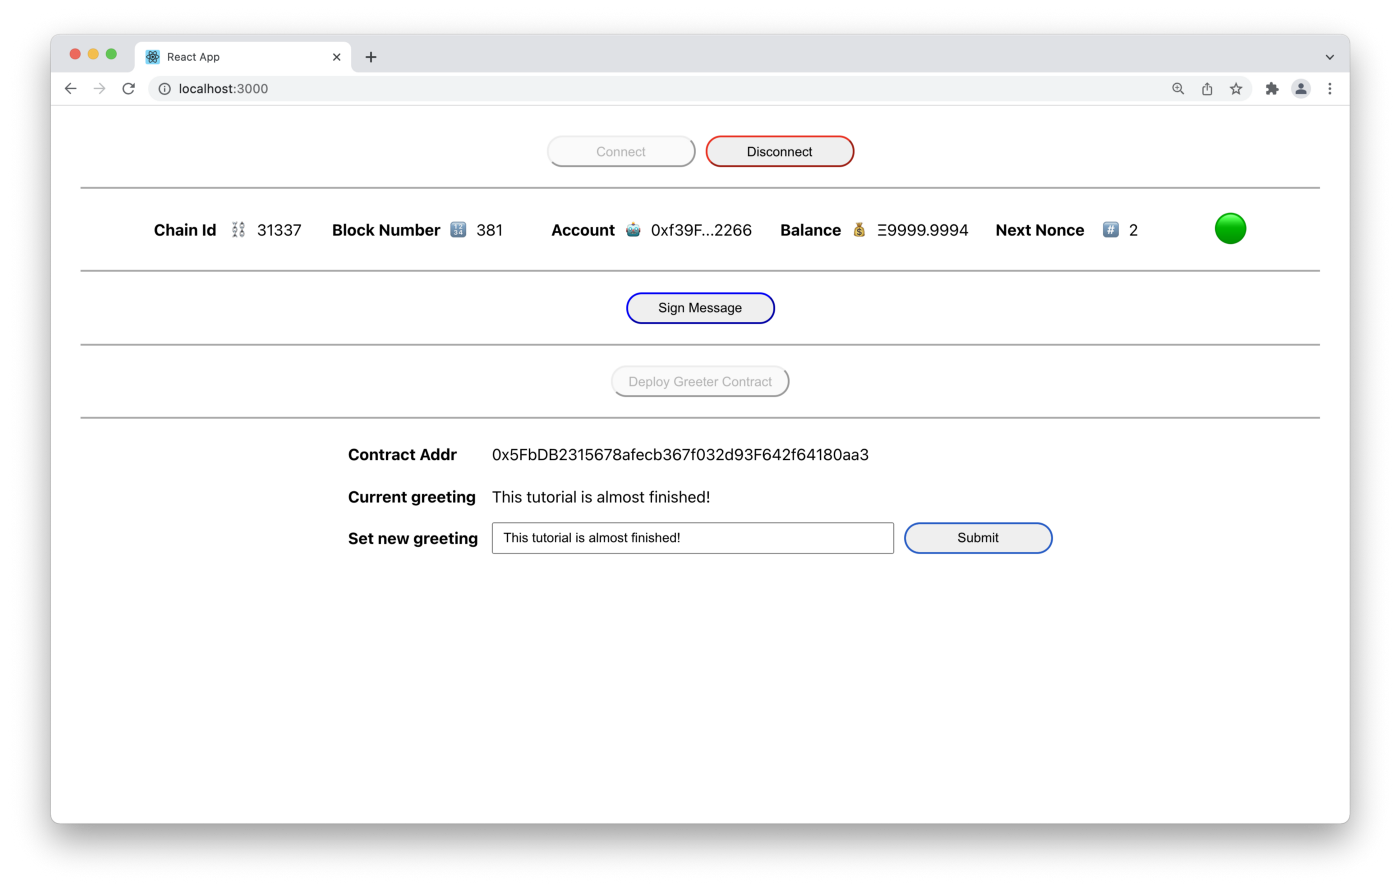
You can see the current greeting has been updated. You can also see that your account balance has decreased a bit more and your Next Nonce is now 2. Things are good!
Caveat: If you are starting and stopping your Hardhat node a lot during development you might run into a problem that will be good to be aware of. Sometimes MetaMask’s cached block data will get out of sync with Hardhat’s actual state when restarting the Hardhat node. If this happens, an easy way to reset MetaMask’s cached data is to toggle from the Localhost:8545 network to another network in MetaMask’s dialog box, and then switch back to Localhost:8545. Then things will be in sync again and you’ll be all set.
Going Further!
🎉 Congratulations! 🎉
You’ve accomplished a lot here and are well on your way to becoming a blockchain engineer.
Go forth, be creative, and have fun with all this! 😃
Some ideas you might want to explore further with this project are:
- Make people pay 💰to change the greeting. 😃 Change the Greeter.sol's setGreeting() function to be payable. Then write a withdraw() function in the contract and add withdraw functionality into the frontend Dapp. Ensure only the owner of the Greeter contract can withdraw money. Check out OpenZeppelin’s Ownable.sol contract for inspiration on how to do this.
- Currently the Dapp only allows you to deploy 1 instance of the Greeter contract. Add functionality to the Dapp that allows you to deploy and interact with multiple instances of the Greeter contract.
- The Dapp works with the local Hardhat network. Modify the Dapp functionality to deploy and interact with the Greeter contract on a test network like Rinkeby or Ropsten.
If you’d like to learn more about blockchain technology come have a look at ChainShot where you will see lots of free courses and information about our more in-depth, live instructor-led 10 week Ethereum bootcamps that we run several times a year.


